Mastering Redux: A Comprehensive Guide for Beginners

I'm a Software Engineer who loves challenges and is good at decision making. Skilled in HTML, CSS, JavaScript, Typescript, Node.JS, Express.JS, and React, with a strong attention to detail and problem-solving abilities, I'm passionate about staying ahead of industry trends and taking on new challenges.
Hello guys, welcome to another blog by me. Today we will be discussing about Redux.
This blog will cover up the following concepts:
Prop Drilling
useContextanduseReducerhooksRedux, Redux-Toolkit
A Project to gain a better insight into the topic
Why Redux?
Before understanding what is Redux, we need to understand "Why Redux?".
Usually, in our React applications, we have various components and as the application becomes complex, the number of components keep rising and this gives rise to the issue of prop drilling.
What is prop drilling?
Let's say we have 5 components in our React application, and we declare a state variable in component A, and let's say we want to use it in component E. Here comes the issue. There's no way to do this directly. We have to forcefully pass/drill the state variable as a prop through the other 3 components B, C, and D, even though they don't need that state variable. This is the issue known as Prop Drilling.
Consider the following code for a better understanding:
import React, { useState, useEffect } from 'react';

const A = () => {
    //create a state variable num
    const [num, setNum] = useState(11);
    return <B num={num} />;
}

const B = ({ num }) => {
    return <C num={num} />;
}

const C = ({ num }) => {
    return <D num={num} />;
}

const D = ({ num }) => {
    return <E num={num} />;
}

const E = ({ num }) => {
    useEffect(() => {
        console.log(num);
    }, [num]);

    return null;
}

export default A;
Notice, how num was needed, only in components A and E, but we still had to pass it through components B, C, and D, even though they don't need it.
To address this issue, we create a global store for this state variable num and from there it can be accessed with ease by any component.
It's like making the state variable global for the entire codebase/component tree.
Now, before diving into Redux, I would like to cover two hooks in React, namely useContext and useReducer, as they play a crucial role in managing states and global contexts.
useContext hook in React
In React useContext is a hook that allows us to share state variables with the entire component tree, hence avoiding the issue of prop drilling.
Consider the below code for a better idea:
import React, { createContext, useContext } from 'react';

// Create a context with an initial value
const NumContext = createContext();

const main = () => {
  const num = 11;

  return (
    <NumContext.Provider value={num}>
      <A />
    </NumContext.Provider>
  );
}

const A = () => {
  // Access num directly without prop drilling
  const num = useContext(NumContext);

  return <B />;
}

const B = () => {
  return <C />;
}

const C = () => {
  return <D />;
}

const D = () => {
  return <E />
}

const E = () => {
  // Access num directly without prop drilling
  const num = useContext(NumContext);
  useEffect(() => {
    console.log(num);
  }, []);
}

export default main;
The above code is pretty much self explanatory. We created a main component and inside it, we created a global context for the num variable. Now, we can use this value globally inside any component.
useReducer hook in React
useReducer is a hook that is useful when managing complex state logic that involves multiple sub-values or when state transitions depend on the previous state. It's often used in combination with useContext to create a more robust state management solution.
Consider the following code for a better insight:
import React, { useReducer } from 'react';

// Create a reducer function
const reducer = (state, action) => {
  switch (action.type) {
    case 'INCREMENT':
      return { count: state.count + 1 };
    default:
      return state;
  }
}

const Counter = () => {
  const [state, dispatch] = useReducer(reducer, { count: 0 });

  return (
    <div>
      Count: {state.count}
      <button onClick={() => dispatch({ type: 'INCREMENT' })}>Increment</button>
    </div>
  );
}

export default Counter;
In the above code, we created a reducer. Reducer in simple language, is a function that is used to handle changes in state.
The reducer in the above code, takes a state variable count and a corresponding INCREMENT case, which is used to increase the value of count variable by 1.
Then, we can simple use useReducer hook with this reducer and the initial state as parameters. We can call this INCREMENT case by using the dispatch function.
What is Redux?
I hope you got the basic idea of why we need Redux, and how for smaller applications we can use useContext and useReducer hooks rather than Redux. Now, let's understand what is Redux.
Redux is a state management library commonly used with React to manage the state of an application. It provides a centralized store to hold the entire state of the application and follows a unidirectional data flow pattern.
Some key concepts in Redux:
Store: The store like a global object that holds all of our state data and makes it available throughout the component tree.
Actions: Actions are plain JavaScript objects that describe changes in the application state. They must have a
typeproperty indicating the type of action being performed.Reducers: Reducers are pure functions responsible for handling actions and producing the next state of the application. They take the current state and an action as parameters and return a new state.
Now, I know you would be like what's the difference between actions and reducers? So, let's understand that first.
Actions describe events that occur in an application, and reducers determine how the state should change in response to those actions. Actions are dispatched to the Redux store, and the corresponding reducers handle these actions to produce the next state.
So reducers basically are functions that define how a state must be changed while the actions are the actual functions that make the changes to the state.
Dispatch: Dispatch is a function provided by the Redux store. It is used to send actions to the store. When an action is dispatched, it triggers the state change in the store.
Middleware: Middleware provides a third-party extension point between dispatching an action and the moment it reaches the reducer. It is often used for logging, asynchronous actions, and other side effects.
In conclusion Redux is a library that is used to create a global store for all your state variables, to avoid the issue of prop drilling, and make it easier for all the components in the tree access any state variable.
Redux Flow
Look at the following diagram to understand flow of a Redux application.
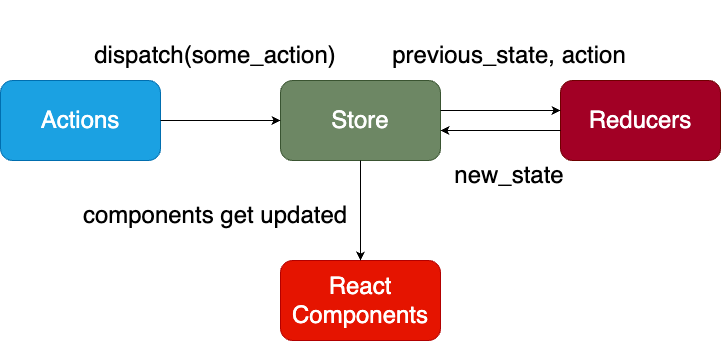
The above diagram is pretty much self-explanatory. We have some action, which gets dispatched to the redux store, and then the state is updated according to the corresponding reducer. The new state is returned to the required React component, which gets updated accordingly.
Let's build a project to get a better insight
I hope you understood all the basics and theory up till now. Now, it's time for practical implementation. Without building a project, you can't develop or progress as a software developer.
Idea behind the project
The idea behind the project is simple. To avoid overcomplicating things, I have decided to create a simple TODO APPLICATION, which would have meanly 3 features:
Add a new todo
Delete a todo
Edit a todo
Asynchronously add a new todo
Tech Stack used
To implement this project, I have used:
React.js
Redux-Toolkit (obviously)
TypeScript
Material UI
Tailwind CSS
Let's start:
First, create a new folder on your PC, and also create a GitHub repository for the same and connect your local folder with GitHub.
I won't be covering how to do this. It's pretty straightforward. You can watch a tutorial on YouTube, if you don't know.
Now, open the folder that you have created in VSCode or any other IDE of your choice, and type the following command to create a React project, with TypeScript as the language:
npm create vite@latest . -- --template react-ts.After this run:
npm i, to install all the required node modules.Then, run
npm run devto find the project working on thehttp://localhost:5173/.Erase all of the pre-defined content in
App.tsx,App.cssandindex.css.Then, we need to install Tailwind CSS. For that check out the official docs:
Then, install Material UI using the command:
npm install @mui/material @emotion/react @emotion/styled.Next install
redux-toolkitandreact-reduxusing the command:npm i @redux/toolkit react-redux.Now, the next step is to create a global store. Create a
statefolder in thesrcfolder. Then create a filestore.tsin it. Include the following content in it:import { configureStore } from "@reduxjs/toolkit"; export const store = configureStore({ }) export type RootState = ReturnType<typeof store.getState>; export type AppDispatch = typeof store.dispatch;The code is pretty simple. We fetched
configureStorefrom@reduxjs/toolkit, then created a store using the same. Then we exported twotypesforRootStateandAppDispatch. These types will be used later.AppDispatchwill serve as a type for thedispatchfunction, whileRootStatewill serve as a type foruseSelectorhook.But note that, as of now, the above code will give some error as we haven't defined the
reducerswithin the store.Next, let's create our
todoSlice.tsxfile which will contain our reducers and actions. And we will usecreateSlicefunction for that.createSliceis a utility function provided by Redux Toolkit that simplifies the process of creating Redux reducer logic and action creators.Include the following code in the file:
 import { PayloadAction, createAsyncThunk, createSlice } from "@reduxjs/toolkit";

 interface TodoState {
     todos: {
         id: number;
         task: string;
     }[];
 }

 const initialState: TodoState = {
     todos: [
         {id: 1, task: "Read a book"}
     ]
 }

 const todoSlice = createSlice({
     name: "todos",
     initialState,
     reducers: {
         addTodo: (state, action: PayloadAction<{ task: string }>) => {
             const newTodo = {
                 id: state.todos.length + 1,
                 task: action.payload.task,
             }

             state.todos.push(newTodo);
         },
         removeTodo: (state, action: PayloadAction<{ id: number }>) => {
             state.todos = state.todos.filter((todo) => todo.id !== action.payload.id);
         },
         editTodo: (state, action: PayloadAction<{ id: number | null, task: string }>) => {
             const todoToEdit = state.todos.find((todo) => todo.id === action.payload.id);

             if (todoToEdit) {
                 todoToEdit.task = action.payload.task;
             }
         },
     },
     extraReducers: (builder) => {
         builder.addCase(addTodoAsync.fulfilled, (state, action: PayloadAction<{ task: string}>) => {
             const newTodo = {
                 id: state.todos.length + 1,
                 task: action.payload.task,
             }

             state.todos.push(newTodo);
         });
     }
 })

 export const addTodoAsync = createAsyncThunk(
     "note/addTodoAsync",
     async (todo: { task: string }) => {
         await new Promise((resolve) => setTimeout(resolve, 1000));
         return todo;
     }
 );

 export const { addTodo, removeTodo, editTodo } = todoSlice.actions;
 export default todoSlice.reducer;
Now, let's go through the above code:
First, we created an interface for the TodoState. A todo will basically include an id and a task.
Then, we created an initial state for our slice, in which I have created a default task.
Then we start creating our
todoSlice, using thecreateSlicefunction. First, we give a name to it (todos), then we pass the initial state we created before and then thereducerobject which will hold all of our reducers.addTodo: This one is simple, we are taking a task as parameter and creating a new todo using the same, then adding the same tostate.todos.removeTodo: For this, we take theidof the todo we want to delete as parameter and then filter the content accordingly.editTodo: For this, we need both theidand thetask. We search for the todo, we wanna edit based on it'sidand then do the required changes accordingly.
Now, if you noticed, there's another object in the code by the name of
extraReducers. Before understanding this, you need to understandcreateAsyncThunk.createAsyncThunkis a utility function provided by the Redux Toolkit that simplifies the process of handling asynchronous logic in Redux. It is particularly useful for making API calls or any asynchronous operations within your Redux actions.So, what I basically did is create a promise that resolves after 1 second, so that adding a new note takes some time. (Ik that it doesn't make any sense logically and practically but I just did it to show you a use case of
createAsyncThunk.Now, let's get back to
extraReducers, which basically takesbuilderas argument, and we can add cases to thisbuilderobject based on if an async action has beenfulfilledor ispending. Then, we can write the required logic, which in this case is for adding a new note.Then, we exported the required
actionsandreducers.
Next, we have to update the store with the reducers.
 import { configureStore } from "@reduxjs/toolkit";
 import todoReducer from "./todo/todoSlice";

 export const store = configureStore({
     reducer: todoReducer
 })

 export type RootState = ReturnType<typeof store.getState>;
 export type AppDispatch = typeof store.dispatch;
Now, we have to wrap our
main.tsxwithin store.import React from 'react' import ReactDOM from 'react-dom/client' import App from './App.tsx' import './index.css' import { Provider } from 'react-redux'; import { store } from './state/store.ts'; ReactDOM.createRoot(document.getElementById('root')!).render( <React.StrictMode> <Provider store = {store}> <App /> </Provider> </React.StrictMode>, )We are done with the
Reduxpart. Now, let's get started with implementing our components and the frontend.First create a new folder called
components, and then create a new file calledAddTodo.tsxand include the following code in it:import { useState } from 'react'; import { useDispatch } from 'react-redux'; import { addTodo } from '../state/todo/todoSlice'; import { AppDispatch } from '../state/store'; import { addTodoAsync } from '../state/todo/todoSlice'; export const AddTodo = () => { const [task, setTask] = useState<string>(""); const dispatch = useDispatch<AppDispatch>(); const handleFormSubmit = (e: React.FormEvent) => { e.preventDefault(); dispatch(addTodo({ task })); } const handleFormSubmitAsync = (e: React.FormEvent) => { e.preventDefault(); dispatch(addTodoAsync({ task })); } return ( <div className="flex flex-row"> <form onSubmit={handleFormSubmit}> <input className="p-[0.7rem] min-w-[40rem] rounded-[0.4rem] border-2 border-black bg-white" onChange={(e) => setTask(e.target.value)} /> <button className="bg-emerald-700 p-[0.7rem] border-2 border-white rounded-lg ml-10 text-lg text-white"> Add a Note </button> </form> <form onSubmit={handleFormSubmitAsync}> <button className="bg-emerald-700 p-[0.7rem] border-2 border-white rounded-lg ml-10 text-lg text-white"> Add Async Note </button> </form> </div> ) }You can see that the above code is pretty simple. We basically created a form that takes in a note, and then you can dispatch either of the 2 actions:
Add a NoteorAsynchronously Add a Note. And, we have already defined the correspondingreducers, which will be called using thedispatchfunction.Next, create a component called
EditTodo.tsx.import React, { useState, useEffect } from 'react'; import { Box, Modal } from '@mui/material'; import { useDispatch } from 'react-redux'; import { editTodo } from '../state/todo/todoSlice'; interface EditTodoProps { open: boolean; handleClose: () => void; currTaskId: number | null; currTask: string; } export const EditTodo: React.FC<EditTodoProps> = ({ open, handleClose, currTaskId, currTask }) => { const [updatedTask, setUpdatedTask] = useState<string>(currTask); const dispatch = useDispatch(); useEffect(() => { setUpdatedTask(currTask); }, [currTask]); const handleClick = () => { dispatch(editTodo({ id: currTaskId, task: updatedTask })); handleClose(); } return ( <Modal open={open} onClose={handleClose} sx={{ display: 'flex', alignItems: 'center', justifyContent: 'center', top: '50%', left: '50%', transform: 'translate(-50%, -50%)', backgroundColor: 'turquoise', border: '2px solid white', borderRadius: '0.7rem', maxHeight: '15rem', maxWidth: '60rem', }} > <Box> <input className="border-2 border-black w-[30rem] h-[3rem] p-2" value={updatedTask} onChange={(e) => setUpdatedTask(e.target.value)} /> <button className="ml-10 bg-emerald-700 border-2 border-white text-lg text-white rounded-lg px-6 py-2" onClick={handleClick}> Edit Note </button> </Box> </Modal> ); };This code, is basically opening a Modal, which opens up after the
editbutton on a note is clicked. It shows the current content of thetodo, which you can update and it gets reflected according to thereducercreated before.Lastly, create a component
Todos.tsxwhich will display all of our required todos. But before that run the following command on your terminal:npm install @mui/icons-material.This command installs the icons provided by MUI.import { useState } from 'react'; import { useSelector, useDispatch } from 'react-redux'; import { Box, List, ListItem, ListItemText, ListItemIcon } from '@mui/material'; import { RootState } from '../state/store'; import { AddTodo } from './AddTodo'; import EditIcon from '@mui/icons-material/Edit'; import DeleteIcon from '@mui/icons-material/Delete'; import { removeTodo } from '../state/todo/todoSlice'; import { EditTodo } from './EditTodo'; export const Todos = () => { const todos = useSelector((state: RootState) => state.todos); const dispatch = useDispatch(); const [open, setOpen] = useState<boolean>(false); const [currTask, setCurrTask] = useState<string>(""); const [currTaskId, setCurrTaskId] = useState<number | null>(null); const handleOpen = (id: number, task: string) => { setCurrTaskId(id); setCurrTask(task); setOpen(true); } const handleClose = () => { setOpen(false); } return ( <Box className="flex flex-col items-center"> <Box className="flex flex-row gap-x-10"> <h1 className="text-3xl">TODOS</h1> <AddTodo/> </Box> <List sx={{ marginTop: "2rem" }}> {todos.map((todo) => ( <ListItem key={todo.id} sx={{ backgroundColor: "turquoise", padding: "0.7rem", borderRadius: "0.4rem", border: "2px solid black", minWidth: "50rem", marginBottom: "2rem" }} > <ListItemText primary={todo.task} /> <ListItemIcon className="cursor-pointer" onClick={() => handleOpen(todo.id, todo.task)}> <EditIcon/> </ListItemIcon> <ListItemIcon className="cursor-pointer" onClick={() => dispatch(removeTodo({ id: todo.id }))}> <DeleteIcon/> </ListItemIcon> </ListItem> ))} </List> <EditTodo open={open} handleClose={handleClose} currTaskId = {currTaskId} currTask = {currTask}/> </Box> ); }This code is also pretty simple. We are displaying all the todos by mapping over the data, and each todo has 2 options,
editanddeletefor which the corresponding action is dispatched.
Here's how the final product looks like:
Here's the link to GitHub and deployed project:
Deployed Link: https://redux-tutorial-gamma.vercel.app/
I hope you learned something new today. You can reach out to me on:


