PENN Stack Mastery: Building a full stack project with Postgres, Express, Node.js, Next.js, and TypeScript

I'm a Software Engineer who loves challenges and is good at decision making. Skilled in HTML, CSS, JavaScript, Typescript, Node.JS, Express.JS, and React, with a strong attention to detail and problem-solving abilities, I'm passionate about staying ahead of industry trends and taking on new challenges.
Hello everyone, today we will build a fullstack app from scratch including the frontend and backend, using PENN stack, i.e., PostgreSQL, Express.js, Node.js, and Next.js. For better experience we will use TypeScript over JavaScript.
We will use PostgreSQL as database, Prisma as ORM, Express.js to create our server, Next.js along with Tailwind CSS for our frontend.
The idea of the project is simple, we will create a simple note taking app with features such as user sign up and login, ability to create a new note, delete and edit a particular note. Lets call the project MemoEase.
Initial Setup
Here's how you can get started with the setup:
Create a new folder on your local PC.

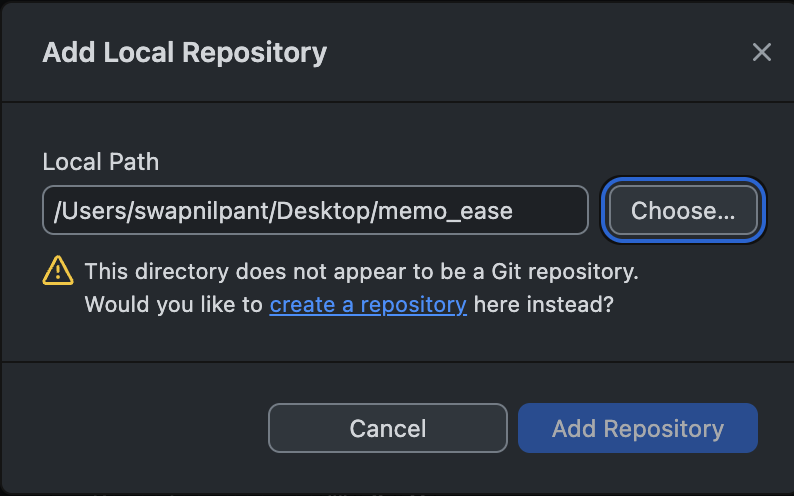
Open GitHub Desktop, and click on Add Existing Repository...

Choose the folder that you created initially, it will ask you to create a repository instead. Do the same, by putting in the required information
After that open that folder in VSCode or any other IDE of your choice.
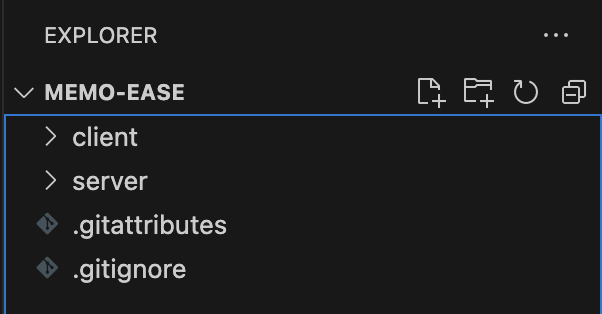
Create 2 folders, namely: client and server.
The initial setup is all done for now.
Backend
First we will create the server for our application and for that we will be using Express.js along with TypeScript.
Follow the following steps to setup the server:
Open your VSCode terminal and type the following command:
cd serverto get to the server folder, then typenpm init --y, to create a node.js project.Next, we need to install some dependencies. Type the following commands one by one to install all the required dependencies:
npm i expressnpm i nodemonnpm i prisma @prisma/client
Next create a new folder called
prismaand inside it create a fileschema.prismain it.In this file, we will create schema for our database. First write the following code in this file:
generator client {
  provider = "prisma-client-js"
}

datasource db {
  provider = "postgresql"
  url      = env("DATABASE_URL")
}
The DATABASE_URL stores the actual url of our database, and for security reasons, we will store it in a .env file.
For the database url, you first need to install PostgreSQL and pgAdmin on your machine. And then, create a new Database and call it memo-ease or anything else that you want.

The database URL would look something like: postgresql://postgres:swapn@localhost:5432/memo-ease
Next let's write our schema for
userandnotes.generator client { provider = "prisma-client-js" } datasource db { provider = "postgresql" url = env("DATABASE_URL") } model User { id String @id @default(uuid()) username String @unique password String email String @unique createdAt DateTime @default(now()) updatedAt DateTime @updatedAt notes Note[] } model Note { id String @id @default(uuid()) title String description String userId String user User @relation(fields: [userId], references: [id]) createdAt DateTime @default(now()) updatedAt DateTime @updatedAt }User will have an id, username, password, email, createdAt, updatedAt and Notes. Note will have an id, title, description, userId, user (this will basically be a relation between a user and Notes, as a single user can have multiple notes), createdAt and updatedAt.
The idea is that we will have multiple users and each user will have zero or more notes that he/she can view, edit or delete.
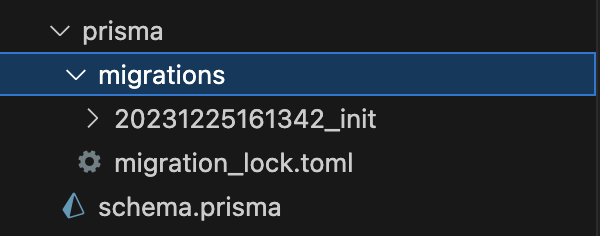
Next, we need to migrate our code to make our Prisma schema in sync with our actual database schema. To do the same, run the following command:
prisma migrate dev --name init.You can read more about Prisma and Prisma migration from their official docs:
https://www.prisma.io/docs/orm/prisma-migrate/getting-started
Upon successful migration, you will see a new folder called
migrationsbeing created inside theprismafolder as follows:
Next, our job is to create our express app and write all the required routes, but before that we need to install TypeScript. Run the following commands to do the setup:
npm install typescript --save-devnpx tsc --initYou will find a
tsconfig.jsonfile has been created. Make sure the file has following content://tsconfig.json { "compilerOptions": { "target": "es2016", "module": "commonjs", "esModuleInterop": true, "forceConsistentCasingInFileNames": true, "strict": true, "skipLibCheck": true, "outDir": "./build", // Use "./build" for clarity "types": ["node", "express", "./custom.d.ts"] }, "include": ["src/**/*"] }Next create a folder
srcand a file calledapp.tsin it. First installcorsby typing the following command:npm i corson terminal.Cross-Origin Resource Sharing (CORS) is a security feature implemented by web browsers to control how web pages in one domain can request and interact with resources on another domain. You can read more about it online. To avoid CORS error we need to use this
corspackage.Next, let's setup our Express app
 import express, {Application, Request, Response} from 'express';

 const PORT: number = 8080;
 const app: Application = express();

 app.use(express.json());
 app.use(cors());

 app.get("/", (req: Request, res: Response): void => {
     res.send("hello world");
 });

 app.listen(PORT, (): void => {
     console.log(`Server is up and running on PORT: ${PORT}`);
 });
After this go to your
package.jsonand inside"scripts", create a key value pair:"start": "tsc --watch & nodemon ./build/app.js"Then type
npm run startin the terminal and go to your browser, searchlocalhost:8080and you will find a page like this: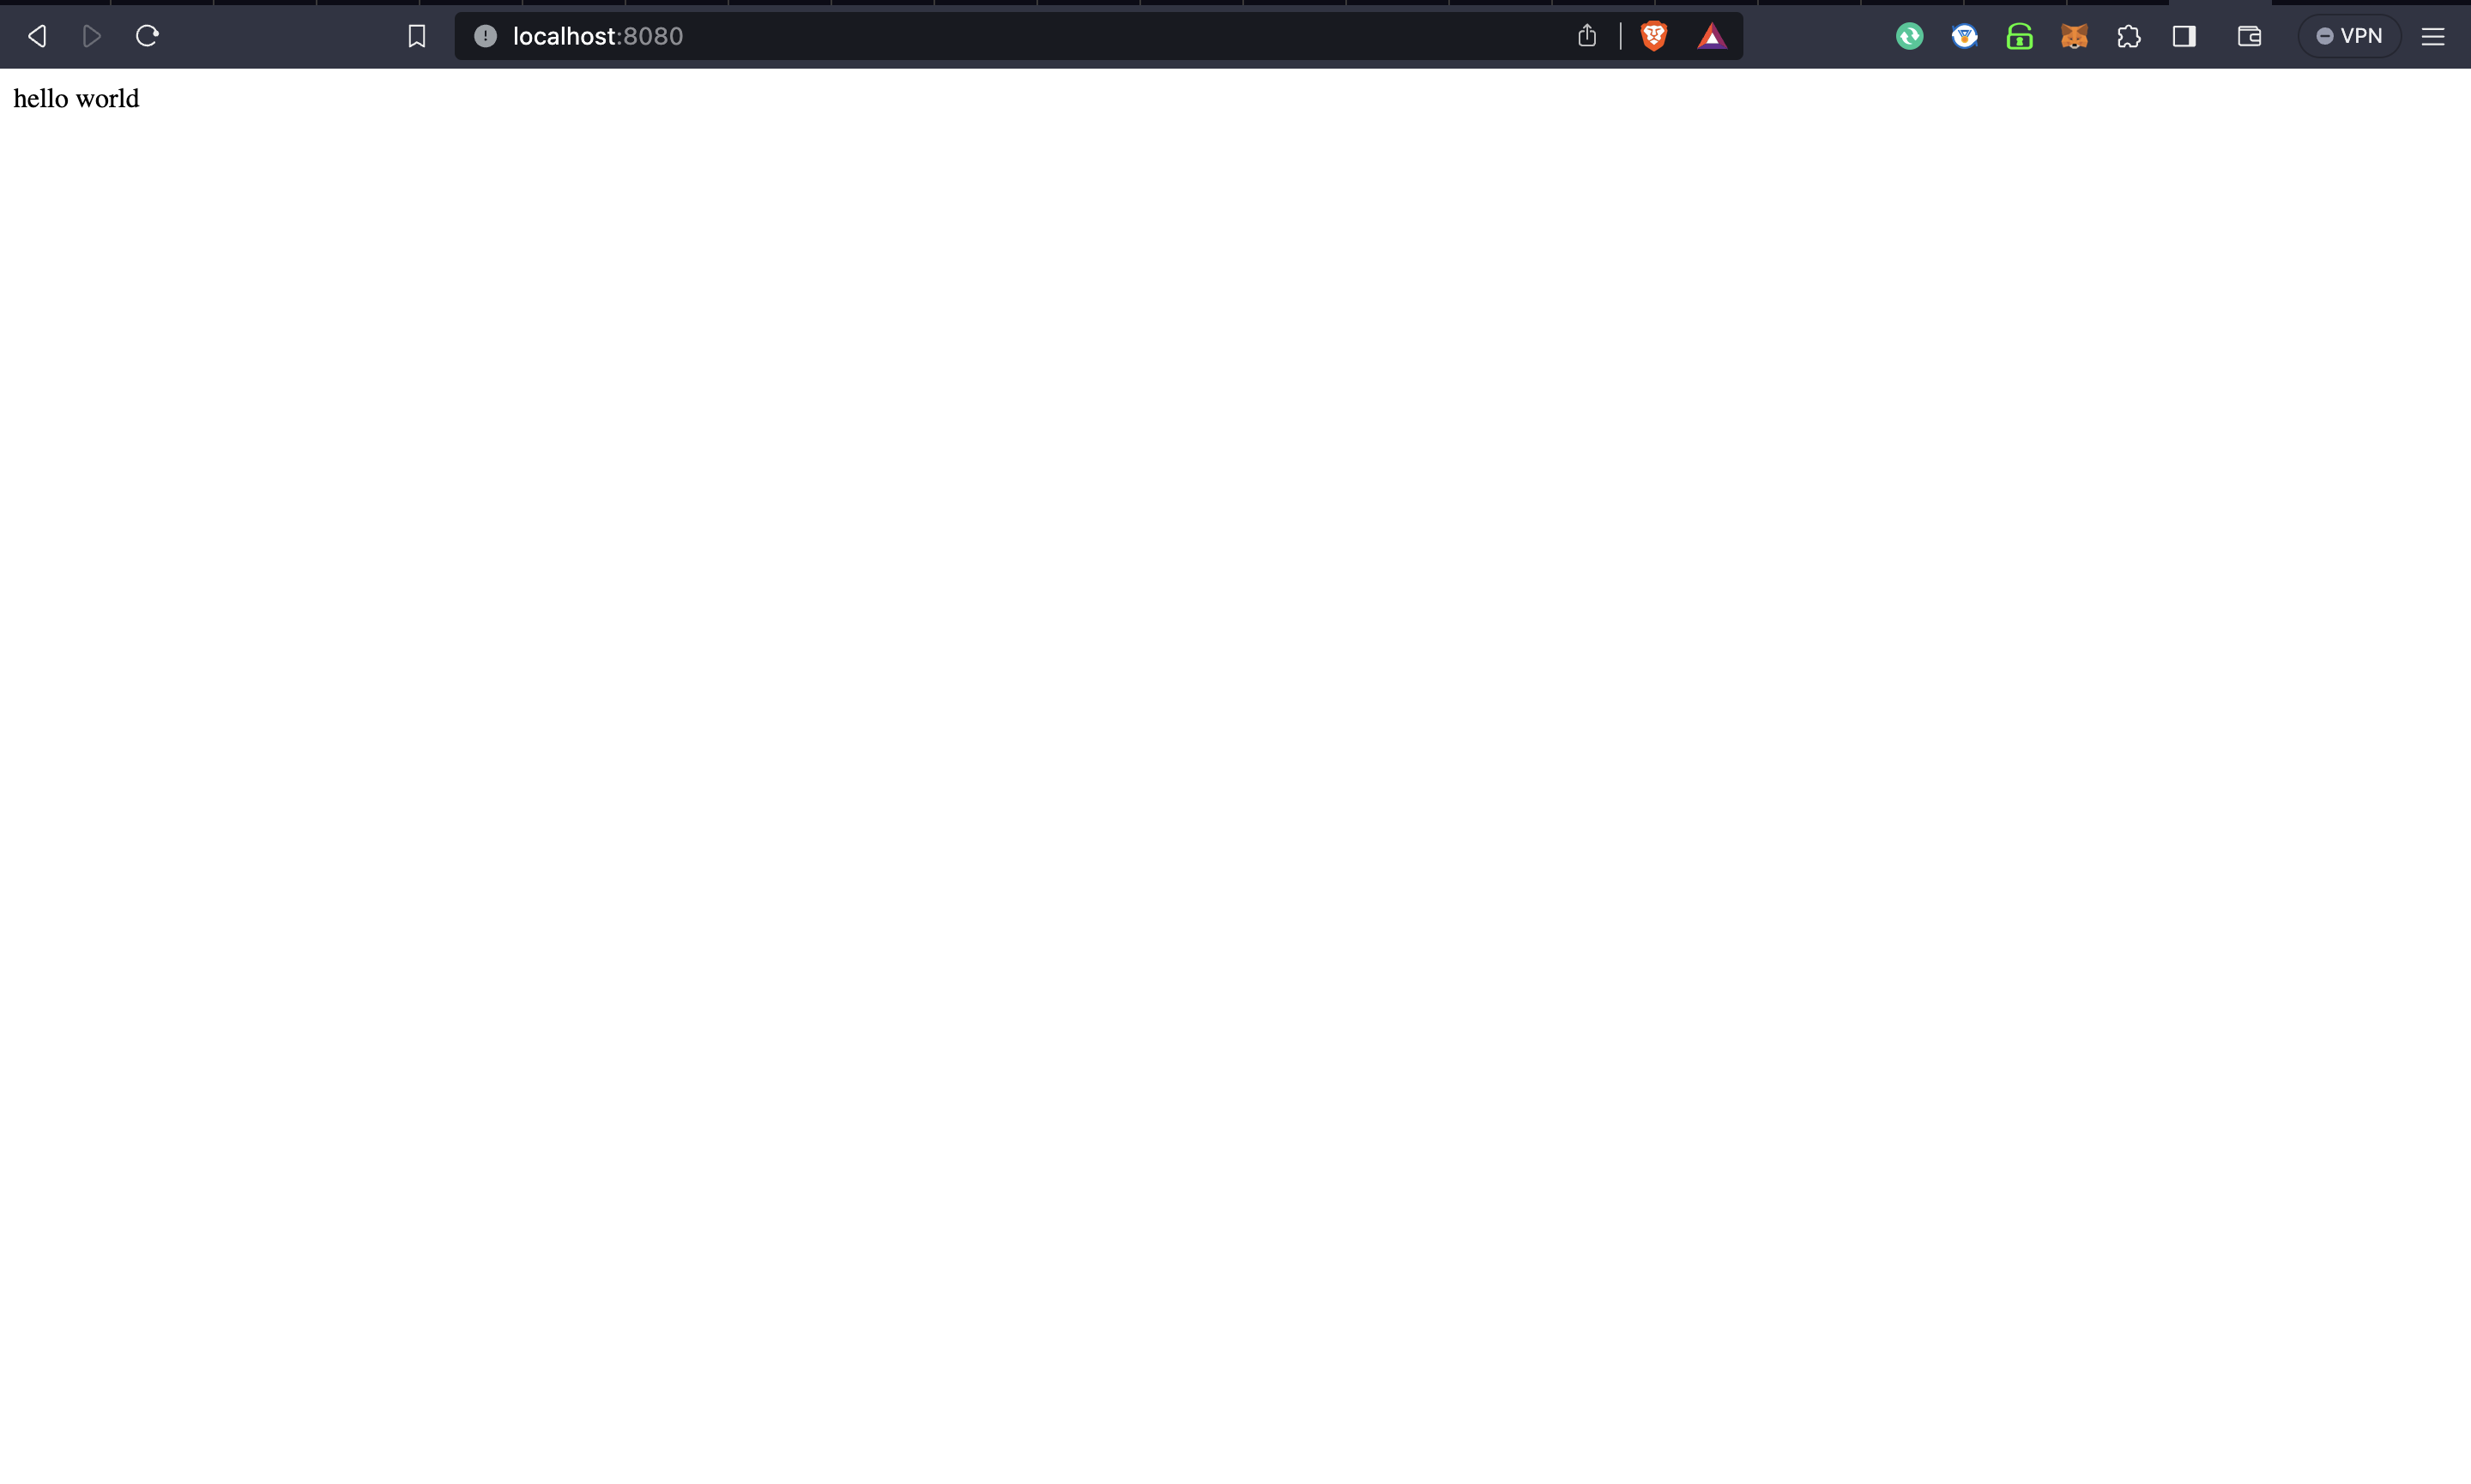
This means your server is up and running.
Congrats you are done with the setup of your express.js app, now our main job starts, i.e., to write all the required API routes for our application.
Routes for User
First let's create a route to register a new user to the database.
The idea is simple, we will take
username,emailandpasswordfrom the user and simply store it in our database.But for that first we need to import PrismaClient to access our database and perform the required operations.
Also you need to install
bcryptto store password in hashed format in the database. For safety purposes, it's recommended to store password in hashed format just in case data is leaked, hacker won't have access to passwords of user. To installbcrypttype the following command in terminal:npm i bcrypt.const bcrypt = require('bcrypt'); //route to register a new user app.post("/register", async (req: Request, res: Response): Promise<void> => { const { username, email, password }: { username: string; email: string; password: string } = req.body; try { // Hash the password const hashedPassword = await bcrypt.hash(password, 10); const newUser = await prisma.user.create({ data: { username, email, password: hashedPassword, }, }); res.json(newUser); } catch (err) { console.error("Error during registration:", err); res.status(500).json({ error: "Internal Server Error" }); }Now, to test this route you can simply go to postman, create a new post request to this route, with the data in body in the following format:

We are done with the Sign Up route. Now, it's time to create a route to login the user to the database. The idea is simple, we will ask user to input his/her username and password, then we will try to look up for that username in our database, if it exists, match the password that user entered with the password in the database, if the password matches then generate a JWT token and return it, implying successful login.
JWT (JSON Web Token) is a compact, URL-safe means of representing claims between two parties. It's often used for user authentication and authorization in web development. JWTs consist of three parts: a header, a payload, and a signature. They're commonly signed to ensure integrity, and their self-contained nature makes them efficient for transmitting information between the client and server securely. You can read more about it online.
To do this, first you need to install a package
jsonwebtokenby typing the commandnpm i jsonwebtoken.You also need to install another package called
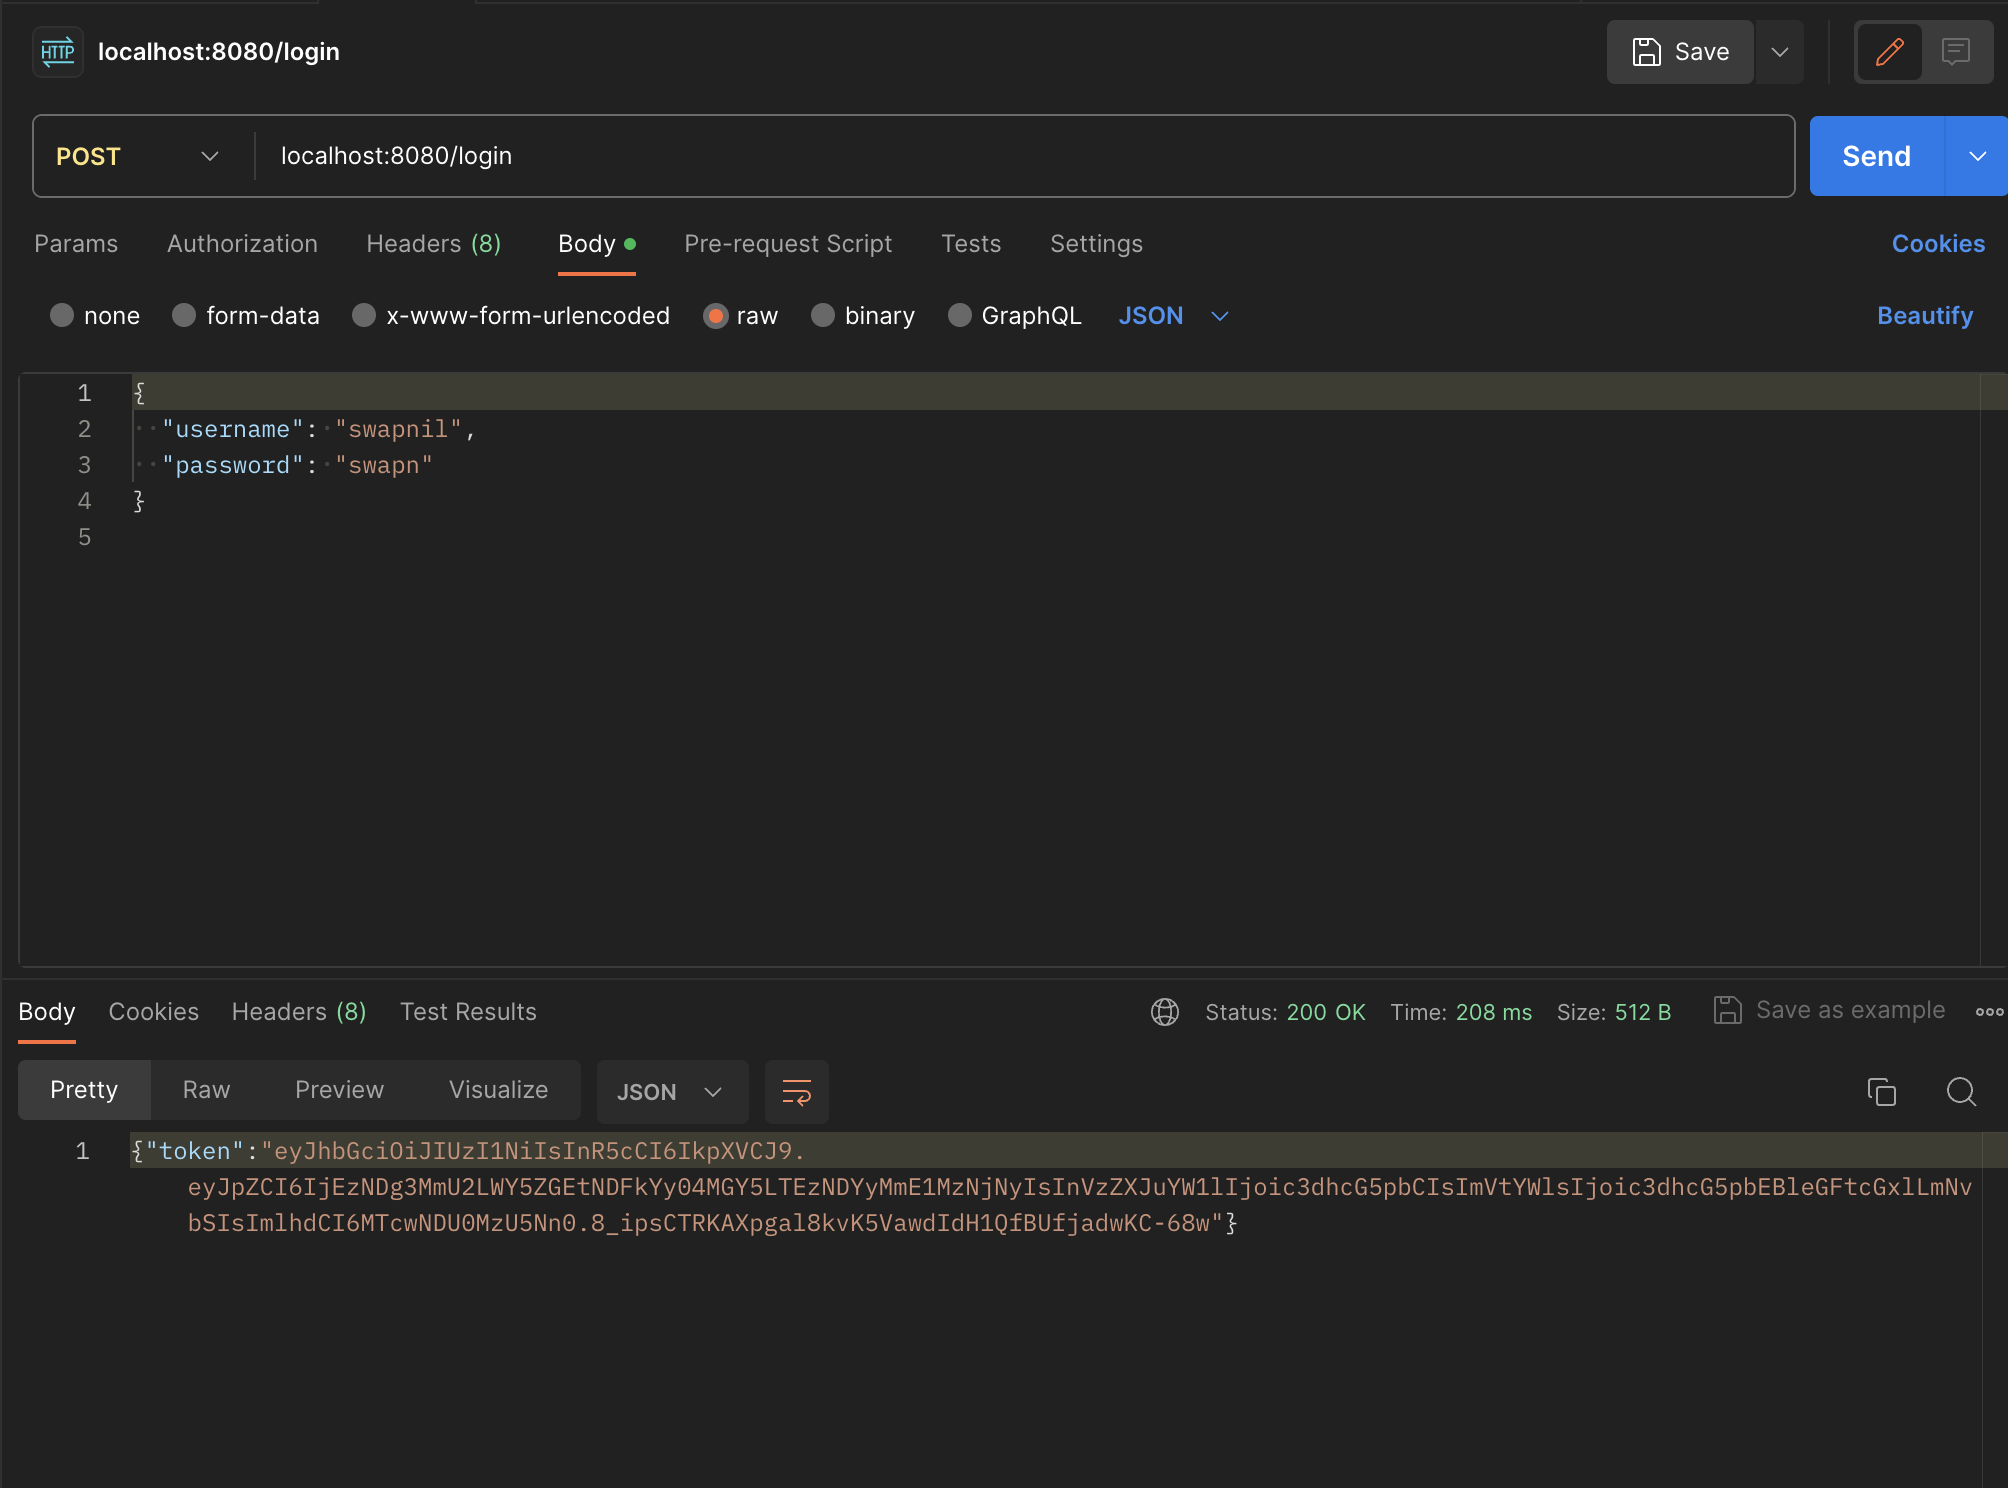
crypto, that will be used to generate a secret key for generating the JWT token.import jwt from 'jsonwebtoken'; const crypto = require('crypto'); const generateSecretKey = () => { return crypto.randomBytes(32).toString('hex'); }; const SECRET_KEY = generateSecretKey(); //route to login app.post('/login', async (req: Request, res: Response): Promise<void> => { const { username, password }: { username: string; password: string } = req.body; try { const user = await prisma.user.findUnique({ where: { username } }); if (!user || !(await bcrypt.compare(password, user.password))) { res.status(401).json({ error: 'Invalid username or password' }); } // Create a JWT with user information const token = jwt.sign({ id: user.id, username: user.username, email: user.email }, SECRET_KEY); res.json({ token }); } catch (err) { console.error('Error during login:', err); res.status(500).json({ error: 'Internal Server Error' }); } });Then, you can check this route too in postman and on successful login it will return a JWT token as response.
After this, we need to create a route to fetch the required information of the currently logged in user from this JWT token. Basically, we want such a feature because let's say on the client side, after logging in, we need a way to display the currently logged in user's name on the navbar.
 // Route to get user information based on the JWT token for the currently logged in user
 app.get('/getCurrentLoggedInUser', (req: Request, res: Response): void => {
   const token = req.headers.authorization?.split(' ')[1];

   // Authorization: 'Bearer TOKEN'
   if (!token) {
     res.status(200).json({ success: false, message: 'Error! Token was not provided.' });
     return;
   }

   try {
     // Decoding the token
     const decodedToken = jwt.verify(token, SECRET_KEY) as { id: string; username: string, email: string };

     res.status(200).json({
       success: true,
       data: {
         id: decodedToken.id,
         username: decodedToken.username,
         email: decodedToken.email,
       },
     });
   } catch (error) {
     res.status(200).json({ success: false, message: 'Invalid token.' });
   }
 });
To test this route, go to Postman, go to the Authorization section, choose type as Bearer Token, and type that particular token that was returned before on successful login here.

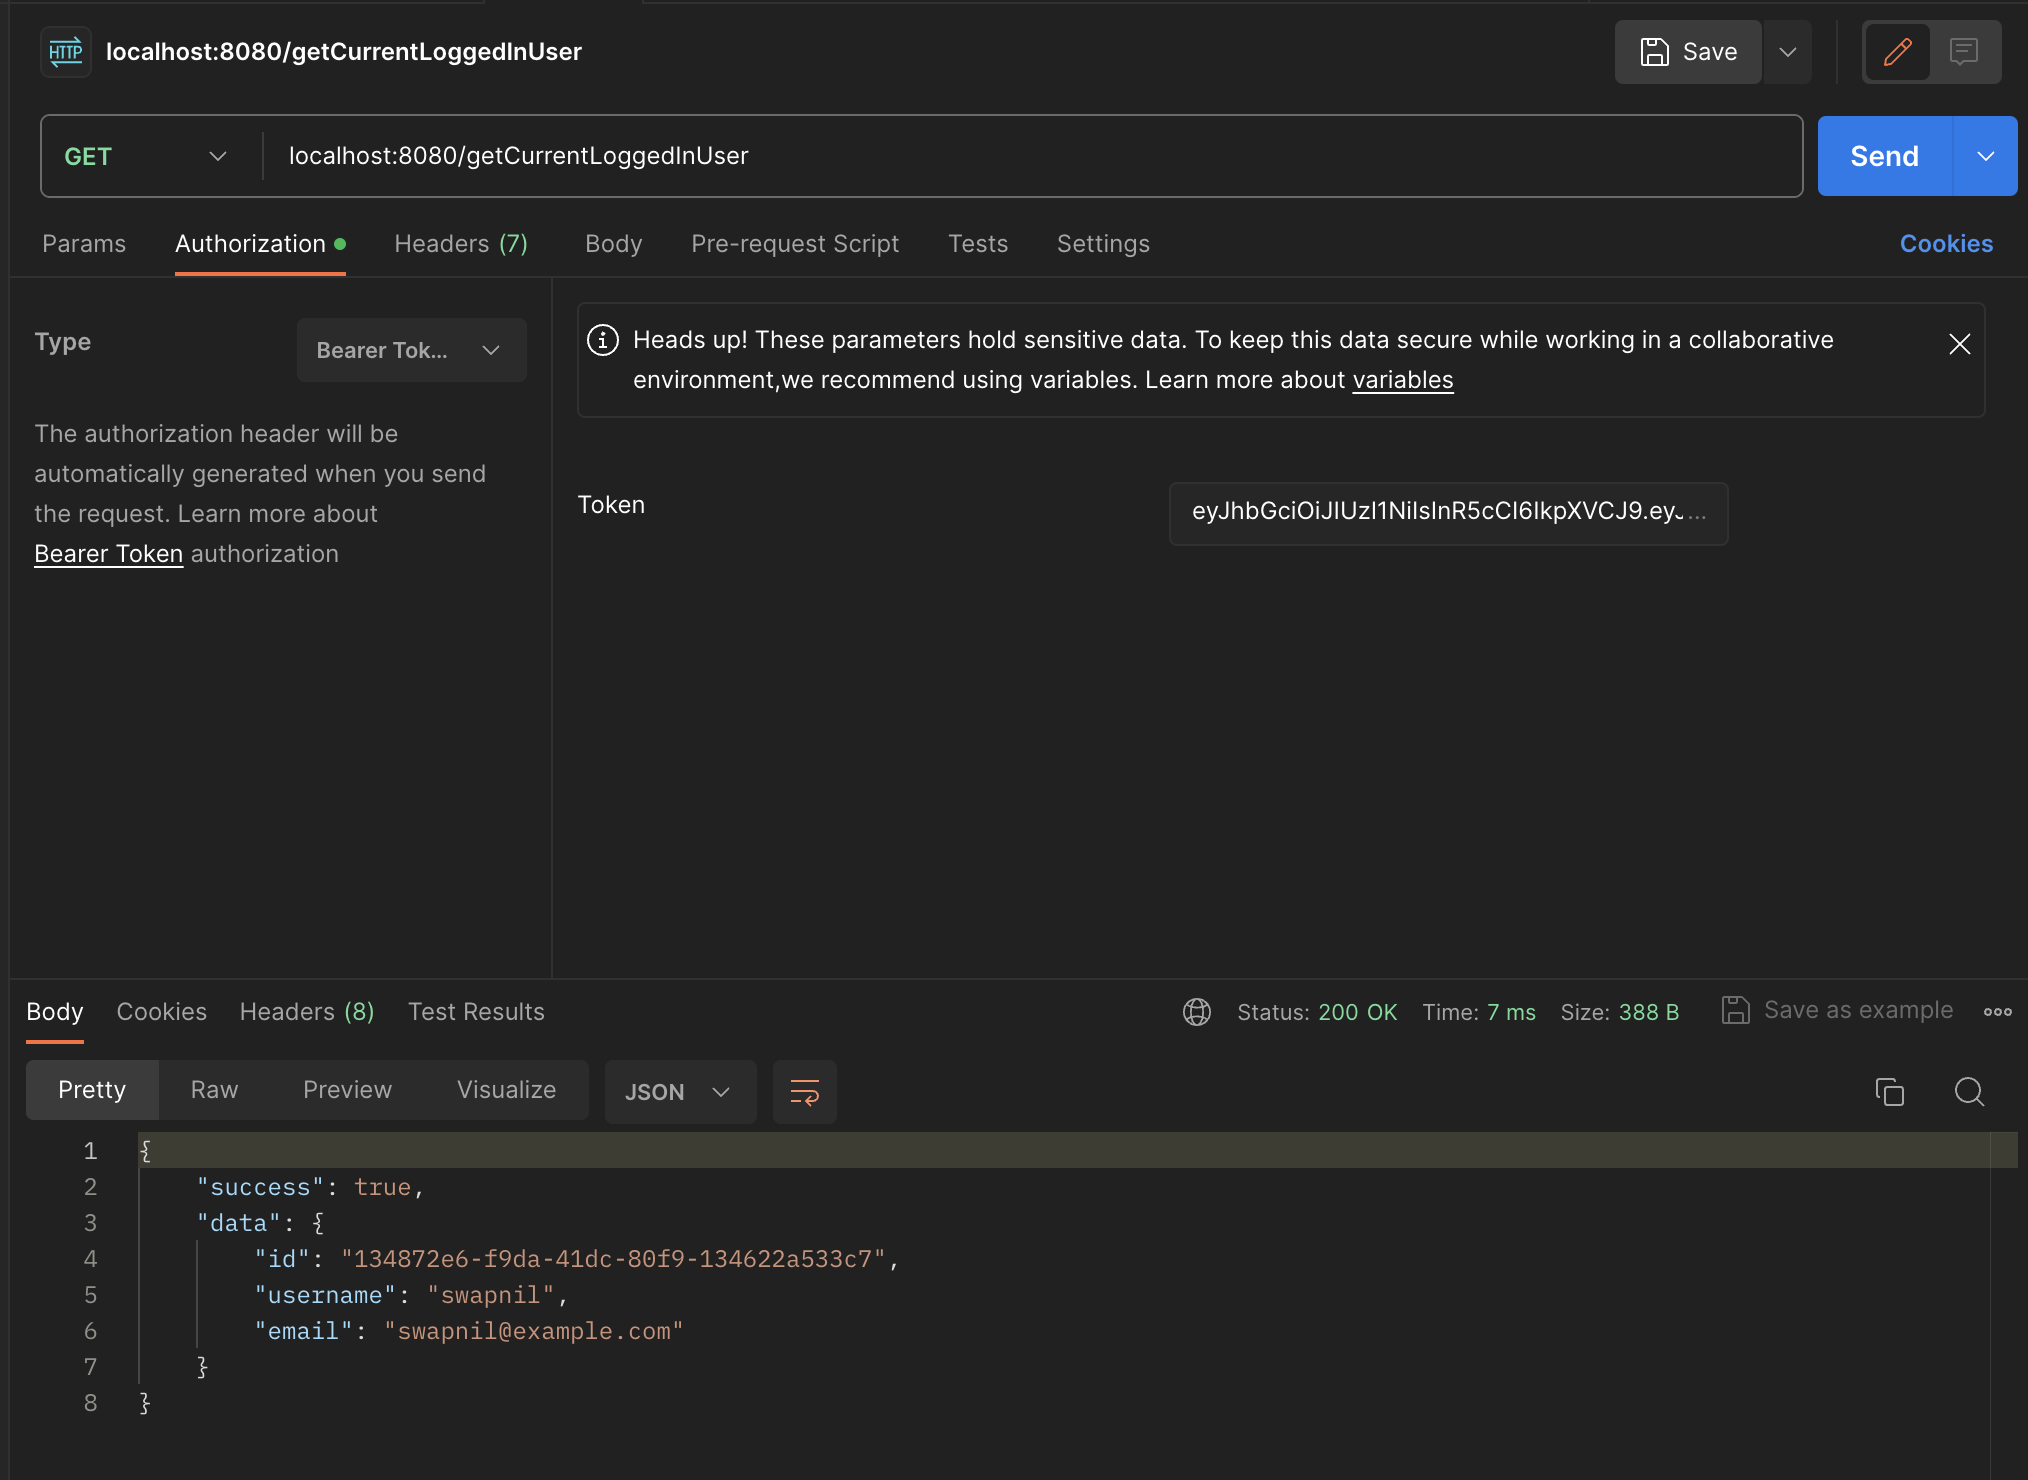
And this is how you will get all the required information of the currently logged in user.
And now, we are done with all the routes related to the user. Next, we need to create routes for our notes.
Routes for Notes.
If you remember our schema, the idea was that each user would have a set of notes with him. So, what we basically want is that after a user logs in and a jwt token is generated, we should be somehow able to get the currently logged in user's id and then we will search for this id in the database and get the corresponding notes.
For this, we will create a middleware.
Middleware is software that acts as a bridge between different components or layers of an application. In web development, it often intercepts and processes requests before they reach the final destination, allowing for tasks like authentication, logging, or modifying the request/response. Think of it as a helpful assistant that manages communication between different parts of your application. You can read more about it online.
 //middleware to fetch the id of user from JWT token
 const extractUserId = (req: Request, res: Response, next: NextFunction): void => {
   const token = req.headers.authorization?.split(' ')[1];

   if (token) {
       try {
           const decoded = jwt.verify(token, SECRET_KEY) as { id: string; username: string, email: string };

           if (typeof decoded === 'string') {
               // In case the token is valid but only contains a string (not a JwtPayload)
               req.userId = decoded;
           } else {
               // If the token is a JwtPayload, extract the user ID
               req.userId = decoded.id;
           }
       } catch (err) {
           // Ignore errors, don't reject the request
       }
   }

   next();
 };
Now, after this first let's create a route to add a new note to the database. It will take title and description from the body and user id generated from that middleware. Then it will simply create a new note and store it in the database.
 //route to add a new note to the database for the currently logged in user
 app.post("/addNote", extractUserId, async (req: Request, res: Response): Promise<void> => {
   const {title, description} : {title: string, description: string} = req.body;
   const userId = req.userId;

   try{
     if(!userId){
       res.status(401).json({error: "Unauthorised"});
       return;
     }

     const newNote = await prisma.note.create({
       data: {
         title,
         description,
         userId
       }
     });

     res.json(newNote);
   }catch(err){
     console.log("New err encountered: ", err);
     res.status(500).json({error: "Internal Server Error"});
   }
 });
You can verify this route in Postman by putting the jwt token in the Authorization section and creating a new JSON object with 2 keys: title and description.
Next, we need a route to fetch all the notes for the currently logged in user.
 //route to fetch the notes for currently logged in user
 app.get("/fetchNotes", extractUserId, async(req: Request, res: Response): Promise<void> => {
   const userId = req.userId;
   try {
     if(!userId){
       res.status(401).json({error: "Unauthorised"});
       return;
     }

     const userWithNotes = await prisma.user.findUnique({
       where:{
         id: userId
       },
       include: {
         notes: true
       }
     });

     if(!userWithNotes){
       res.status(404).json({ error: "User not found" });
       return;
     }

     const notes = userWithNotes.notes;
     res.status(200).json({ notes });
   } catch (error) {
     console.log("New error encountered: ", error);
     res.status(500).json({error: "Internal Server Error"});
   }
 });
Next, we need a route to edit a particular note. The idea is simple, the route accepts id of a note, searches for that particular note in the database, if found, update it's content.
 // route to edit a particular note
 app.patch("/editNote/:id", extractUserId, async (req: Request, res: Response): Promise<void> => {
   const userId = req.userId;
   const noteId = req.params.id;
   const { title, description }: { title: string; description: string } = req.body;

   try {
     // Check if the note exists and belongs to the user
     const existingNote = await prisma.note.findUnique({
       where: {
         id: noteId,
       },
       select: {
         userId: true,
       },
     });

     if (!existingNote || existingNote.userId !== userId) {
       res.status(404).json({ error: 'Note not found or unauthorized' });
       return;
     }

     // Update the note
     const updatedNote = await prisma.note.update({
       where: {
         id: noteId,
       },
       data: {
         title,
         description,
       },
     });

     res.json(updatedNote);
   } catch (error) {
     console.error('Error editing note:', error);
     res.status(500).json({ error: 'Internal Server Error' });
   }
 });
Finally, we need a route to delete a particular note based on it's id.
 //route to delete a particular note
 app.delete("/deleteNote/:id", extractUserId, async(req: Request, res: Response): Promise<void> => {
   const userId = req.userId;
   const noteId = req.params.id;

   try {
     const existingNote = await prisma.note.findUnique({
       where: {
         id: noteId
       },
       select: {
         userId: true
       }
     });

     if(!existingNote || existingNote.userId !== userId){
       res.status(404).json({ error: "Note not found or unauthorised" });
       return;
     }

     await prisma.note.delete({
       where:{
         id: noteId
       }
     });

     res.json({ success: true, message: "note deleted successfully" });
   } catch (error) {
     console.log("Error encountered: ", error);
     res.status(500).json({ error: "Internal Server Error" })
   }
 });
Now, we are done with all the required routes that we need for our application, so let's move to the frontend.
Frontend
For frontend, I am going to use Next.js along with Tailwind CSS.
First open the terminal and type the command cd client to get to the client folder, then type the command npx create-next-app@latest to set up Next.js, make sure you choose TypeScript and Tailwind CSS while setting up.
First, go to
page.jsxin the app folder. This will be the landing page for our application. I want to keep it simple, so I will simply put a basic intro in a box along with a button to go to the/notespage.Here's what the code will be like:
 'use client'
 import React, {useEffect} from 'react';
 import { useRouter } from 'next/navigation';

 export default function Home() {
   const router = useRouter();

   const handleClick = () => {
     router.push("/notes");
   }

   return (
     <main className="flex flex-col justify-center items-center h-screen">
     <div className="bg-blue-700 h-[22rem] w-[20rem] p-6 flex flex-col items-center justify-center text-white rounded-xl">
       <h1 className="text-[1.5rem] underline underline-offset-8 mb-[2rem]">
         Welcome to MemoEase!
       </h1>
       <p className="text-center">
         Unlock the power of effortless organization and enhanced productivity with MemoEase.
         Seamlessly designed for simplicity and efficiency, MemoEase is your digital haven for note-taking and
         task management.
       </p>
     </div>
     <button className="bg-blue-700 h-[4rem] w-[20rem] mt-[2rem] rounded-xl text-white" onClick={handleClick}>
       View my Notes
     </button>
   </main>
   )
 }
Here's how the page will look like:

You can change the design accordingly. Just make sure the basic concept is same, i.e, add an option to visit the
/notespage.Then, first let's create a Navbar and a Footer for our application and make it globally available on all the pages of our application.
For that create a
/componentsfolder and create a file calledFooter.tsxin it.import React from 'react'; export const Footer = () => { return ( <div className="bg-blue-700 w-screen h-[5rem] text-white flex justify-center items-center text-[1.2rem] fixed bottom-0"> Made with ❤️ by Swapnil Pant </div> ) }I kept the footer as simple as possible, you can change it according to your taste.
Now, first let's create a simple SignUp and a Login page. For this, create a new folder called
/signupand then create a new file calledpage.tsxin it. Next.js makes routing very simple. For every webpage that you want in your application, you can simply create a new folder and the name of that folder would be a new route.Here's what you should put in the
/signup/page.tsxfile:'use client' import React, { useState } from 'react'; const SignUp = () => { return ( <div className = "bg-gray-300 w-screen h-screen flex items-center justify-center"> <div className = "h-[30rem] w-[24rem] bg-white rounded-2xl flex flex-col justify-center items-center"> <div className = "bg-blue-600 w-[15rem] text-white py-2 flex justify-center text-[1.1rem] rounded-xl"> Sign Up </div> <form className="mt-[2rem] flex flex-col items-center gap-y-6"> <input placeholder = "Username" className = "w-[18rem] p-2 rounded-lg border-2 border-gray-500" type = "text" name = "username" /> <input placeholder = "Email" type = "email" name = "email" className = "w-[18rem] p-2 rounded-lg border-2 border-gray-500" /> <input placeholder = "Password" type = "password" name = "password" className = "w-[18rem] p-2 rounded-lg border-2 border-gray-500" /> <button className = "bg-blue-600 w-[18rem] h-[3rem] rounded-xl text-white" type = "submit"> Submit </button> </form> </div> </div> ) } export default SignUp;Here's how the SignUp page looks like:

You can change the design accordingly.
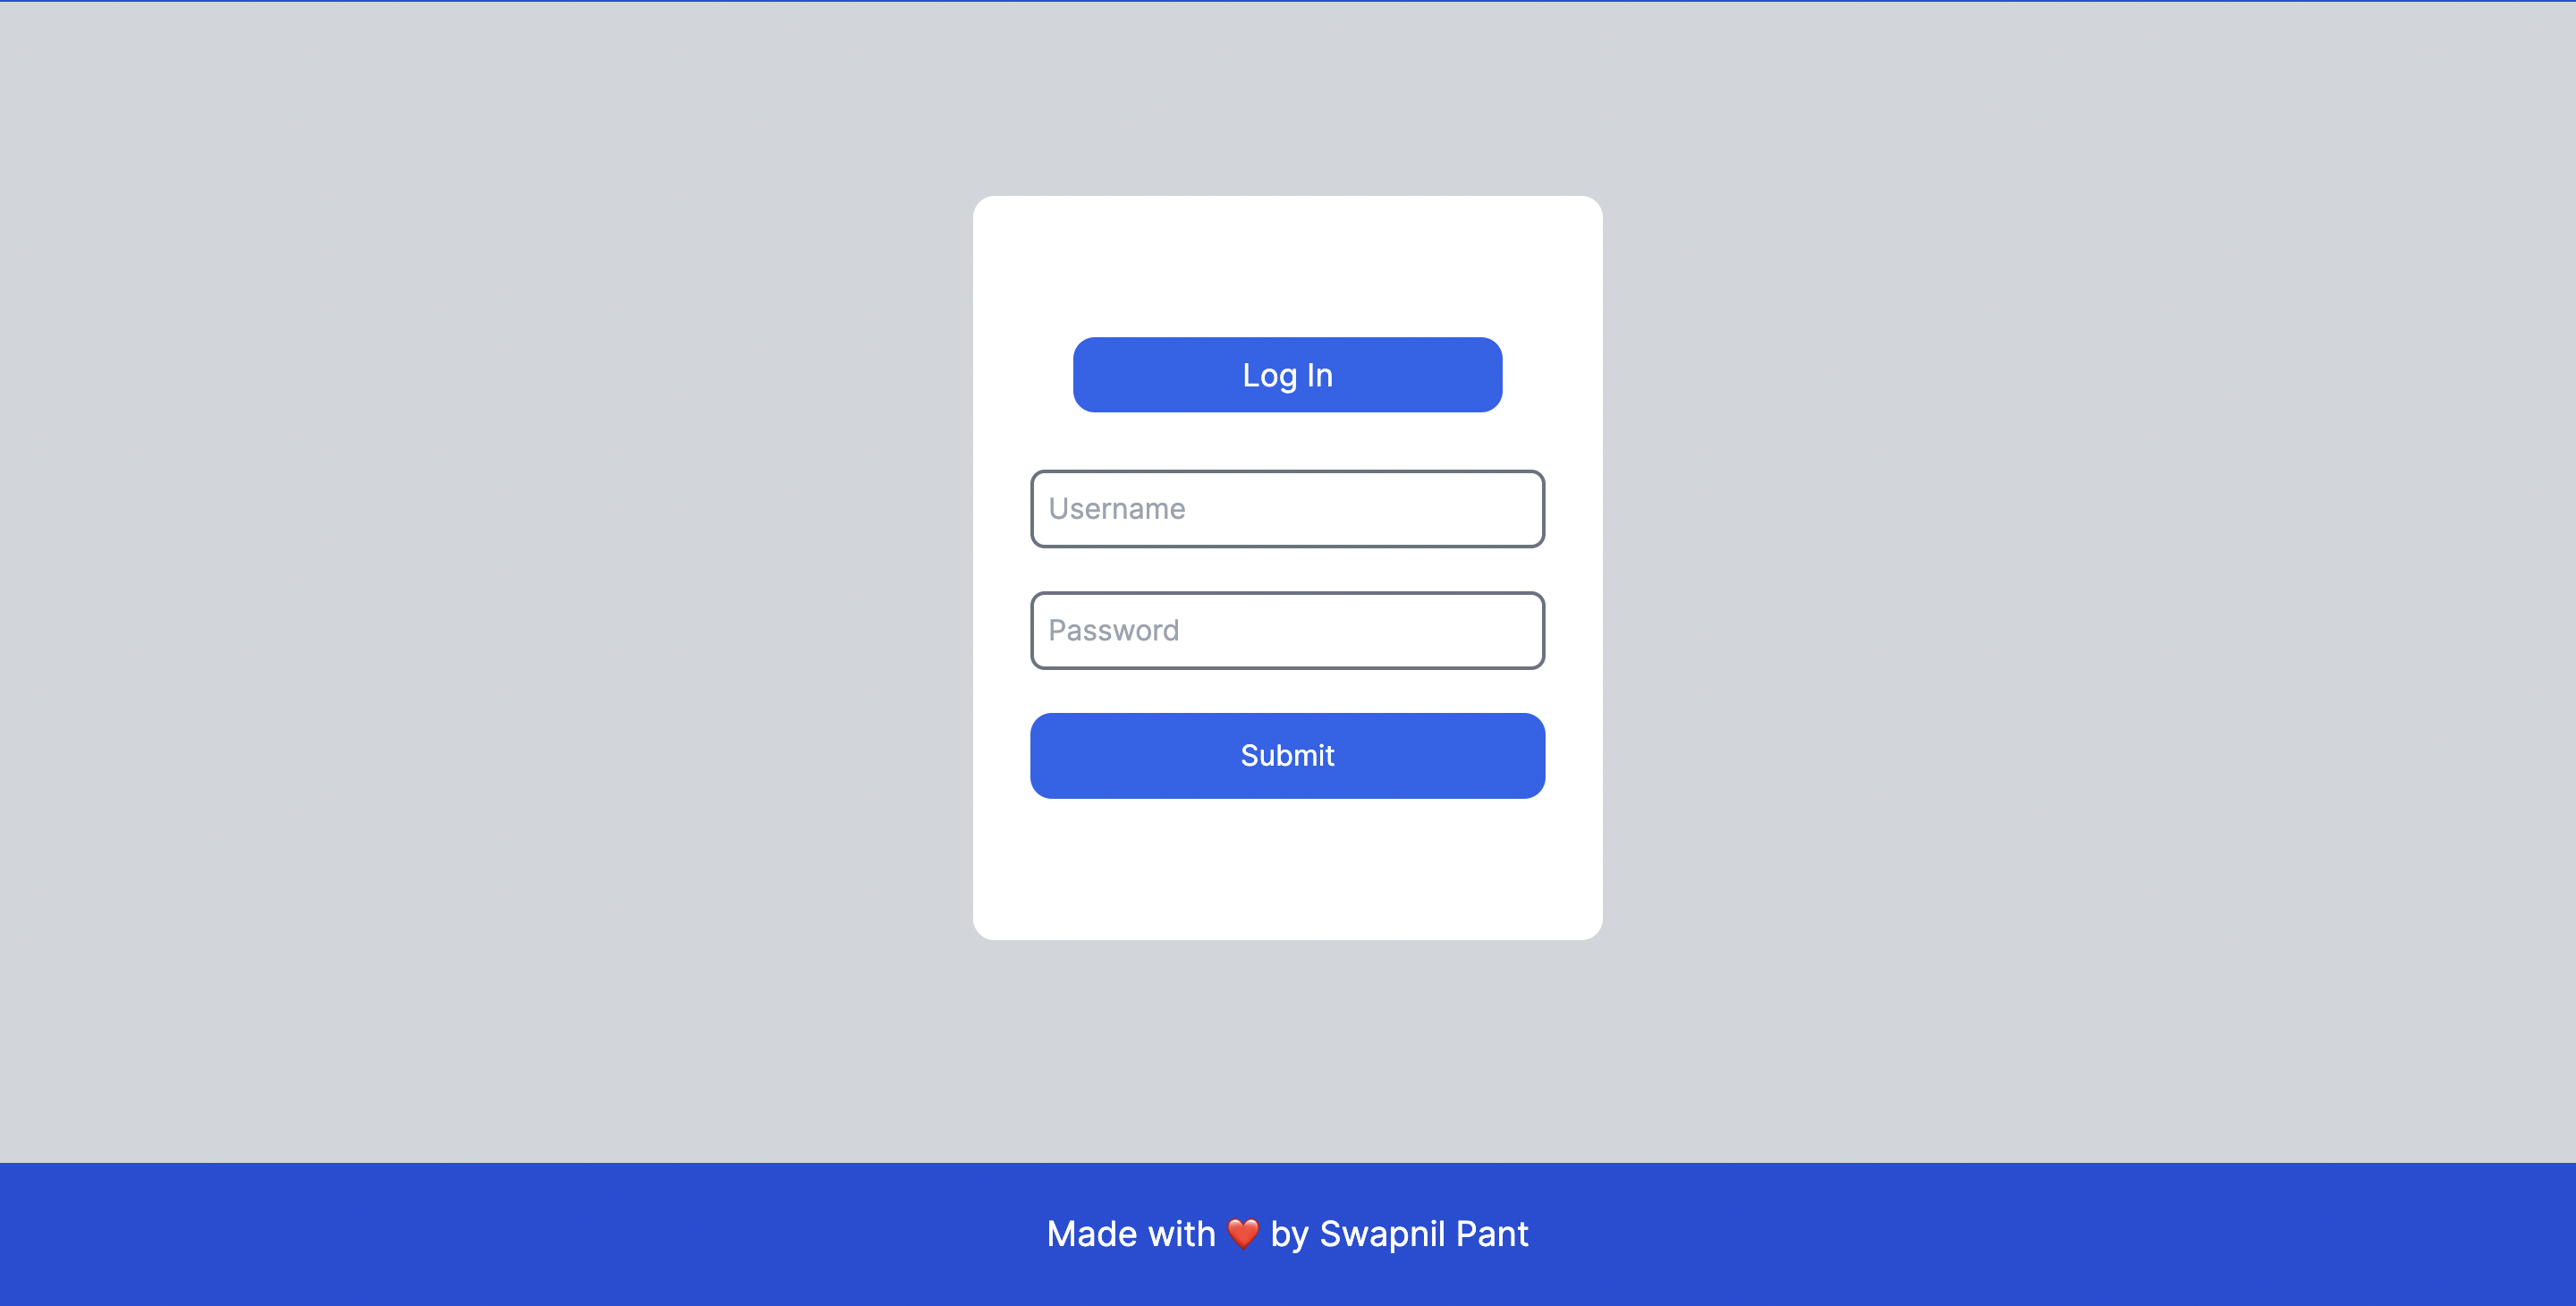
Next, similarly let's implement the Login page too. Create a new file
/login/page.tsxand include the following code in it:'use client' import React, { useState } from 'react'; const Login = () => { return ( <div className="bg-gray-300 w-screen h-screen flex items-center justify-center"> <div className="h-[26rem] w-[22rem] bg-white rounded-xl flex flex-col justify-center items-center"> <div className="bg-blue-600 w-[15rem] text-white py-2 flex justify-center text-[1.1rem] rounded-xl"> Log In </div> <form className="mt-[2rem] flex flex-col items-center gap-y-6"> <input placeholder="Username" type="text" name="username" className="w-[18rem] p-2 rounded-lg border-2 border-gray-500" /> <input placeholder="Password" type="password" name="password" className="w-[18rem] p-2 rounded-lg border-2 border-gray-500" /> <button className="bg-blue-600 w-[18rem] h-[3rem] rounded-xl text-white" type="submit"> Submit </button> </form> </div> </div> ); }; export default Login;This is how the Login page looks like:
Now, let's add functionality to these pages.
For this, first let's create a
/hooksfolder. In this folder, we will create custom hooks. Rather than calling all the APIs that we created earlier again and again, we will create functions for them to avoid code repetition.Our first hook would be to implement that
/registerroute that we created earlier to register a new user to the database.In the
/hooksfolder, create a new file calledsignUp.tsand include the following code in it:import axios from "axios"; interface SignUpData { username: string; email: string; password: string; } const signUp = async (userData: SignUpData): Promise<any> => { try { const response = await axios.post("http://localhost:8080/register", userData); return response.data; } catch(error: any) { throw error.response.data; } } export default signUp;Then go back to that SignUp page that we created earlier and update the code as follows:
```typescript 'use client' import React, { useState } from 'react'; import signUp from '../hooks/signUp'; import { ToastContainer, toast } from 'react-toastify'; import 'react-toastify/dist/ReactToastify.css';
const SignUp = () => { const [formData, setFormData] = useState({ username: "", email: "", password: "" });
const handleChange = (e: any) => { setFormData({ ...formData,
}); }
const handleSubmit = async (e: any) => { e.preventDefault();
try { const user = await signUp(formData); toast.success("Successfully registered..."); } catch(error: any) { toast.error("Registration failed ", error); } }
return (
export default SignUp;
    Note, how on clicking on the submit button, we are simply calling the hook/function that we created just now and then showing success notification. For the notification we used `react-toastify` library. You can simply install it by typing the following command in the terminal: `npm i react-toastify`.

6. Next, similarly we can create a hook to call the `/login` route that we created earlier and implement it in the login page.

    First, create a new file called `login.ts` in the `/hooks` folder and write the following code in it:

    ```typescript
    import axios from "axios";

    interface LoginData {
        username: string;
        password: string;
    }

    const login = async (userData: LoginData): Promise<any> => {
        try {
            const response = await axios.post("http://localhost:8080/login", userData);
            return response.data;
        } catch(error: any) {
            throw error.response.data;
        }
    }

    export default login;
Next, go to your login page code and update the content as follows:
    'use client'
    import React, { useState } from 'react';
    import login from '../hooks/login';
    import { ToastContainer, toast } from 'react-toastify';
    import 'react-toastify/dist/ReactToastify.css';
    import { useAuth } from '../context/AuthContext';
    import { useRouter } from 'next/navigation';

    const Login = () => {
      const { setToken } = useAuth();
      const router = useRouter();

      const [formData, setFormData] = useState({
        username: '',
        password: '',
      });

      const handleChange = (e: React.ChangeEvent<HTMLInputElement>) => {
        setFormData({
          ...formData,
          [e.target.name]: e.target.value,
        });
      };

      const handleSubmit = async (e: React.FormEvent<HTMLFormElement>) => {
        e.preventDefault();

        try {
          const currToken = await login(formData);
          setToken(currToken.token);
          toast.success('Successful login');

          // Redirect to the Notes page
         // setInterval(() => {
           // router.push('/notes');
          //}, 2000);

        } catch (error: any) {
          toast.error('Failed to login', error);
        }
      };

      return (
        <div className="bg-gray-300 w-screen h-screen flex items-center justify-center">
          <div className="h-[26rem] w-[22rem] bg-white rounded-xl flex flex-col justify-center items-center">
            <div className="bg-blue-600 w-[15rem] text-white py-2 flex justify-center text-[1.1rem] rounded-xl">
              Log In
            </div>

            <form className="mt-[2rem] flex flex-col items-center gap-y-6" onSubmit={handleSubmit}>
              <input
                placeholder="Username"
                type="text"
                name="username"
                value={formData.username}
                onChange={handleChange}
                className="w-[18rem] p-2 rounded-lg border-2 border-gray-500"
              />
              <input
                placeholder="Password"
                type="password"
                name="password"
                value={formData.password}
                onChange={handleChange}
                className="w-[18rem] p-2 rounded-lg border-2 border-gray-500"
              />
              <button className="bg-blue-600 w-[18rem] h-[3rem] rounded-xl text-white" type="submit">
                Submit
              </button>
            </form>
          </div>

          <ToastContainer />
        </div>
      );
    };

    export default Login;
This code won't work as of now. We need to create a global context for the token variable. For this check the next step.
Now, we need to create the Navbar before creating our Navbar, we need to do some things. My idea of Navbar is simple, I will show the name of the project on the left most corner and options to SignUp and Login on the right most corner, on successful login it will display the currently logged in user's username along with an option to logout.
First, we need to create a global context to store the token generated on successful login globally so that every component and page of our application can easily access that JWT token.
For this create a new folder
/contextwith a fileAuthContext.tsxin it. And then include the following code in it:'use client' import { createContext, useContext, ReactNode, useEffect, useState } from 'react'; import { setCookie, parseCookies } from 'nookies'; // Install 'nookies' using npm or yarn interface AuthContextProps { token: string | null; setToken: (token: string | null) => void; } const AuthContext = createContext<AuthContextProps | undefined>(undefined); export const AuthProvider: React.FC<{ children: ReactNode }> = ({ children }) => { const initialToken = parseCookies().token || null; const [token, setToken] = useState<string | null>(initialToken); useEffect(() => { // Update the cookie whenever the token changes setCookie(null, 'token', token || '', { maxAge: 30 * 24 * 60 * 60, // 30 days path: '/', }); }, [token]); return ( <AuthContext.Provider value={{ token, setToken }}> {children} </AuthContext.Provider> ); }; export const useAuth = () => { const context = useContext(AuthContext); if (!context) throw new Error('useAuth must be used within an AuthProvider'); return context; };Note that also need a way to make the token available somehow on the client side for the time the user is using the application. The simple idea is to store the token in cookies. You can store it in localStorage or sessionStorage too but it's not recommended as it's not a safe practice and vulnerable to attacks.
For storing the token in cookies I made use of a package called
nookiesthat you can simply install by typing the commandnpm i nookies.After this go to the file
layout.tsx, which is the entry point of your Next.js application and update the code as follows:import type { Metadata } from 'next' import { Inter } from 'next/font/google' import './globals.css' import { Navbar } from './components/Navbar' import { Footer } from './components/Footer' import { AuthProvider } from './context/AuthContext' const inter = Inter({ subsets: ['latin'] }) export const metadata: Metadata = { title: 'Create Next App', description: 'Generated by create next app', } export default function RootLayout({ children, }: { children: React.ReactNode }) {u return ( <AuthProvider> <html lang="en"> <head> {/* Include head elements here */} </head> <body className={inter.className}> <Navbar /> {children} <Footer /> </body> </html> </AuthProvider> ) }We are basically wrapping our entire project in our
AuthProviderto access thetokenand the functionsetTokenglobally. Also, we include theNavbarandFootercomponents in this file too so that they are visible in every single page.Now, we will create a hook to fetch the information of the currently logged in user.
Go to the
/hooksfolder and create a new file calledgetCurrentLoggedInUser.tsand implement the required route in it.import axios from "axios"; import { useEffect, useState } from "react"; import { useAuth } from "../context/AuthContext"; interface UserData { id: string; username: string; email: string; // Add other properties if needed } interface ApiResponse { success: boolean; data: UserData; } const getCurrentLoggedInUserData = () => { const { token } = useAuth(); const [userData, setUserData] = useState<UserData | null>(null); const [loading, setLoading] = useState(true); const [error, setError] = useState<string | null>(null); useEffect(() => { const fetchData = async () => { try { if (!token) { throw new Error("Token not found"); } const response = await axios.get<ApiResponse>("http://localhost:8080/getCurrentLoggedInUser", { headers: { Authorization: `Bearer ${token}`, }, }); setUserData(response.data.data); } catch (error: any) { setError(error.response?.data || error.message); } finally { setLoading(false); } }; fetchData(); }, [token]); return { userData, loading, error }; }; export default getCurrentLoggedInUserData;Note, how we are fetching the
tokenfrom the global context and then simply using it to fetch the required response. For the UserData, we have created an interface, as we know what the UserData would contain. Similarly, we also created an interface for our ApiResponse to avoid any issues later. This is the reason why we preferred using TypeScript over JavaScript.Now, we are all done. Next, simply go to the
/componentsfolder and create a new file calledNavbar.tsxin it and include the following code in it:'use client' import React, { useState, useEffect } from 'react'; import getCurrentLoggedInUserData from '../hooks/getCurrentLoggedInUserData'; import { useAuth } from '../context/AuthContext'; import { destroyCookie } from 'nookies'; export const Navbar = () => { const { token, setToken } = useAuth(); const { userData, loading, error } = getCurrentLoggedInUserData(); useEffect(() => { console.log("usedata: ", userData); }, [userData]) const [isMounted, setIsMounted] = useState(false); useEffect(() => { setIsMounted(true); }, []); if (!isMounted) { return null; } const handleLogout = () => { destroyCookie(null, 'token', { path: '/' }); setToken(null); } return ( <div className="w-full bg-blue-700 text-white h-[6rem] flex flex-row items-center justify-between px-[2rem] fixed top-0 z-[10]"> <a href="/"><h1 className="text-[2rem] cursor-pointer">MemoEase</h1></a> {token ? ( <div className="flex flex-row gap-x-2 items-center"> <img src="./user.png" alt="user_icon" className="w-[2.5rem] h-[2.5rem]" /> <div className = "flex flex-col"> <h1 className="text-[1.1rem]">{userData?.username}</h1> <h1 className="text-pink-200 underline underline-offset-2 cursor-pointer" onClick={handleLogout}>Logout</h1> </div> </div> ) : ( <div className="flex flex-row items-center justify-center text-white gap-x-4"> <a href="/login">Login</a> <a href="/signup">Sign Up</a> </div> )} </div> ); };The idea of the Navbar is simple as I already told you before name of the project on left hand side and the option to Login and Sign Up on right hand side. If token exists, that means someone is already signed in. Just use the hook we created recently to fetch the username of the currently logged in user and display it in place of Login and Sign Up options. Also show an option to logout. Upon clicking logout, the JWT token is deleted from the cookies.
At this point your application is half done and you can simply check out if the Sign Up and Login features are working fine.
Try to go to the
/signuppage and check if it's working by typing in some data.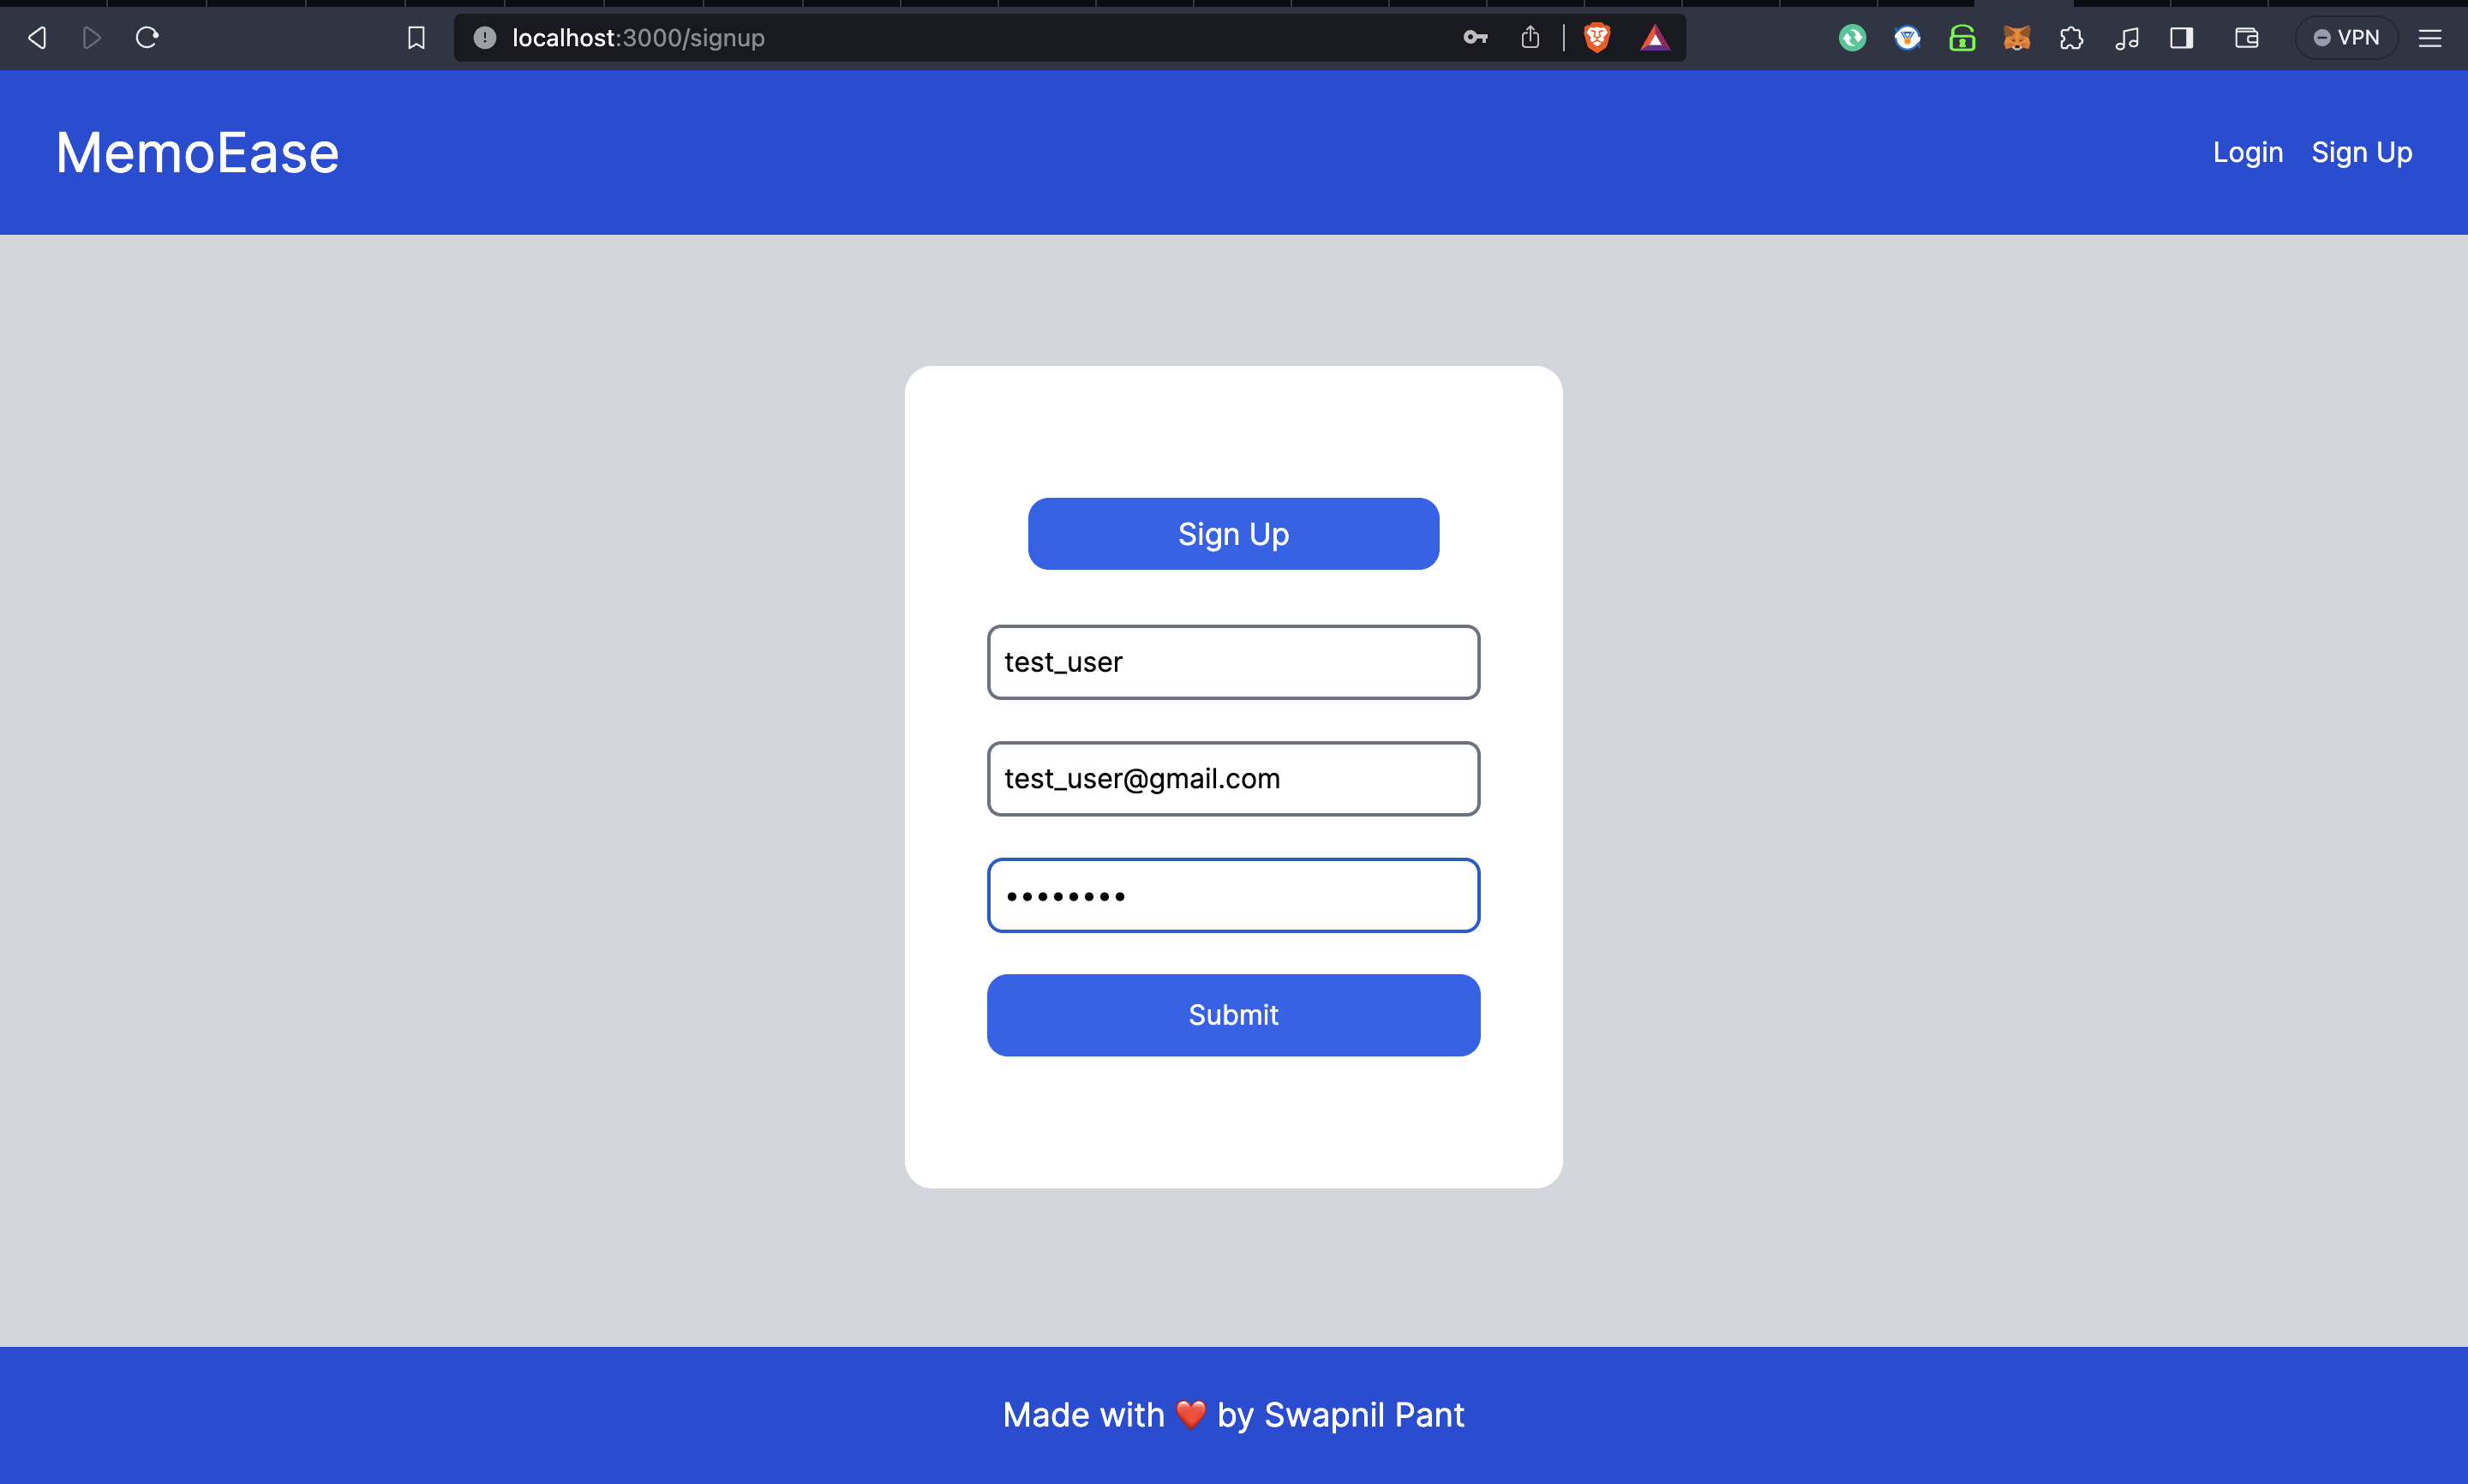
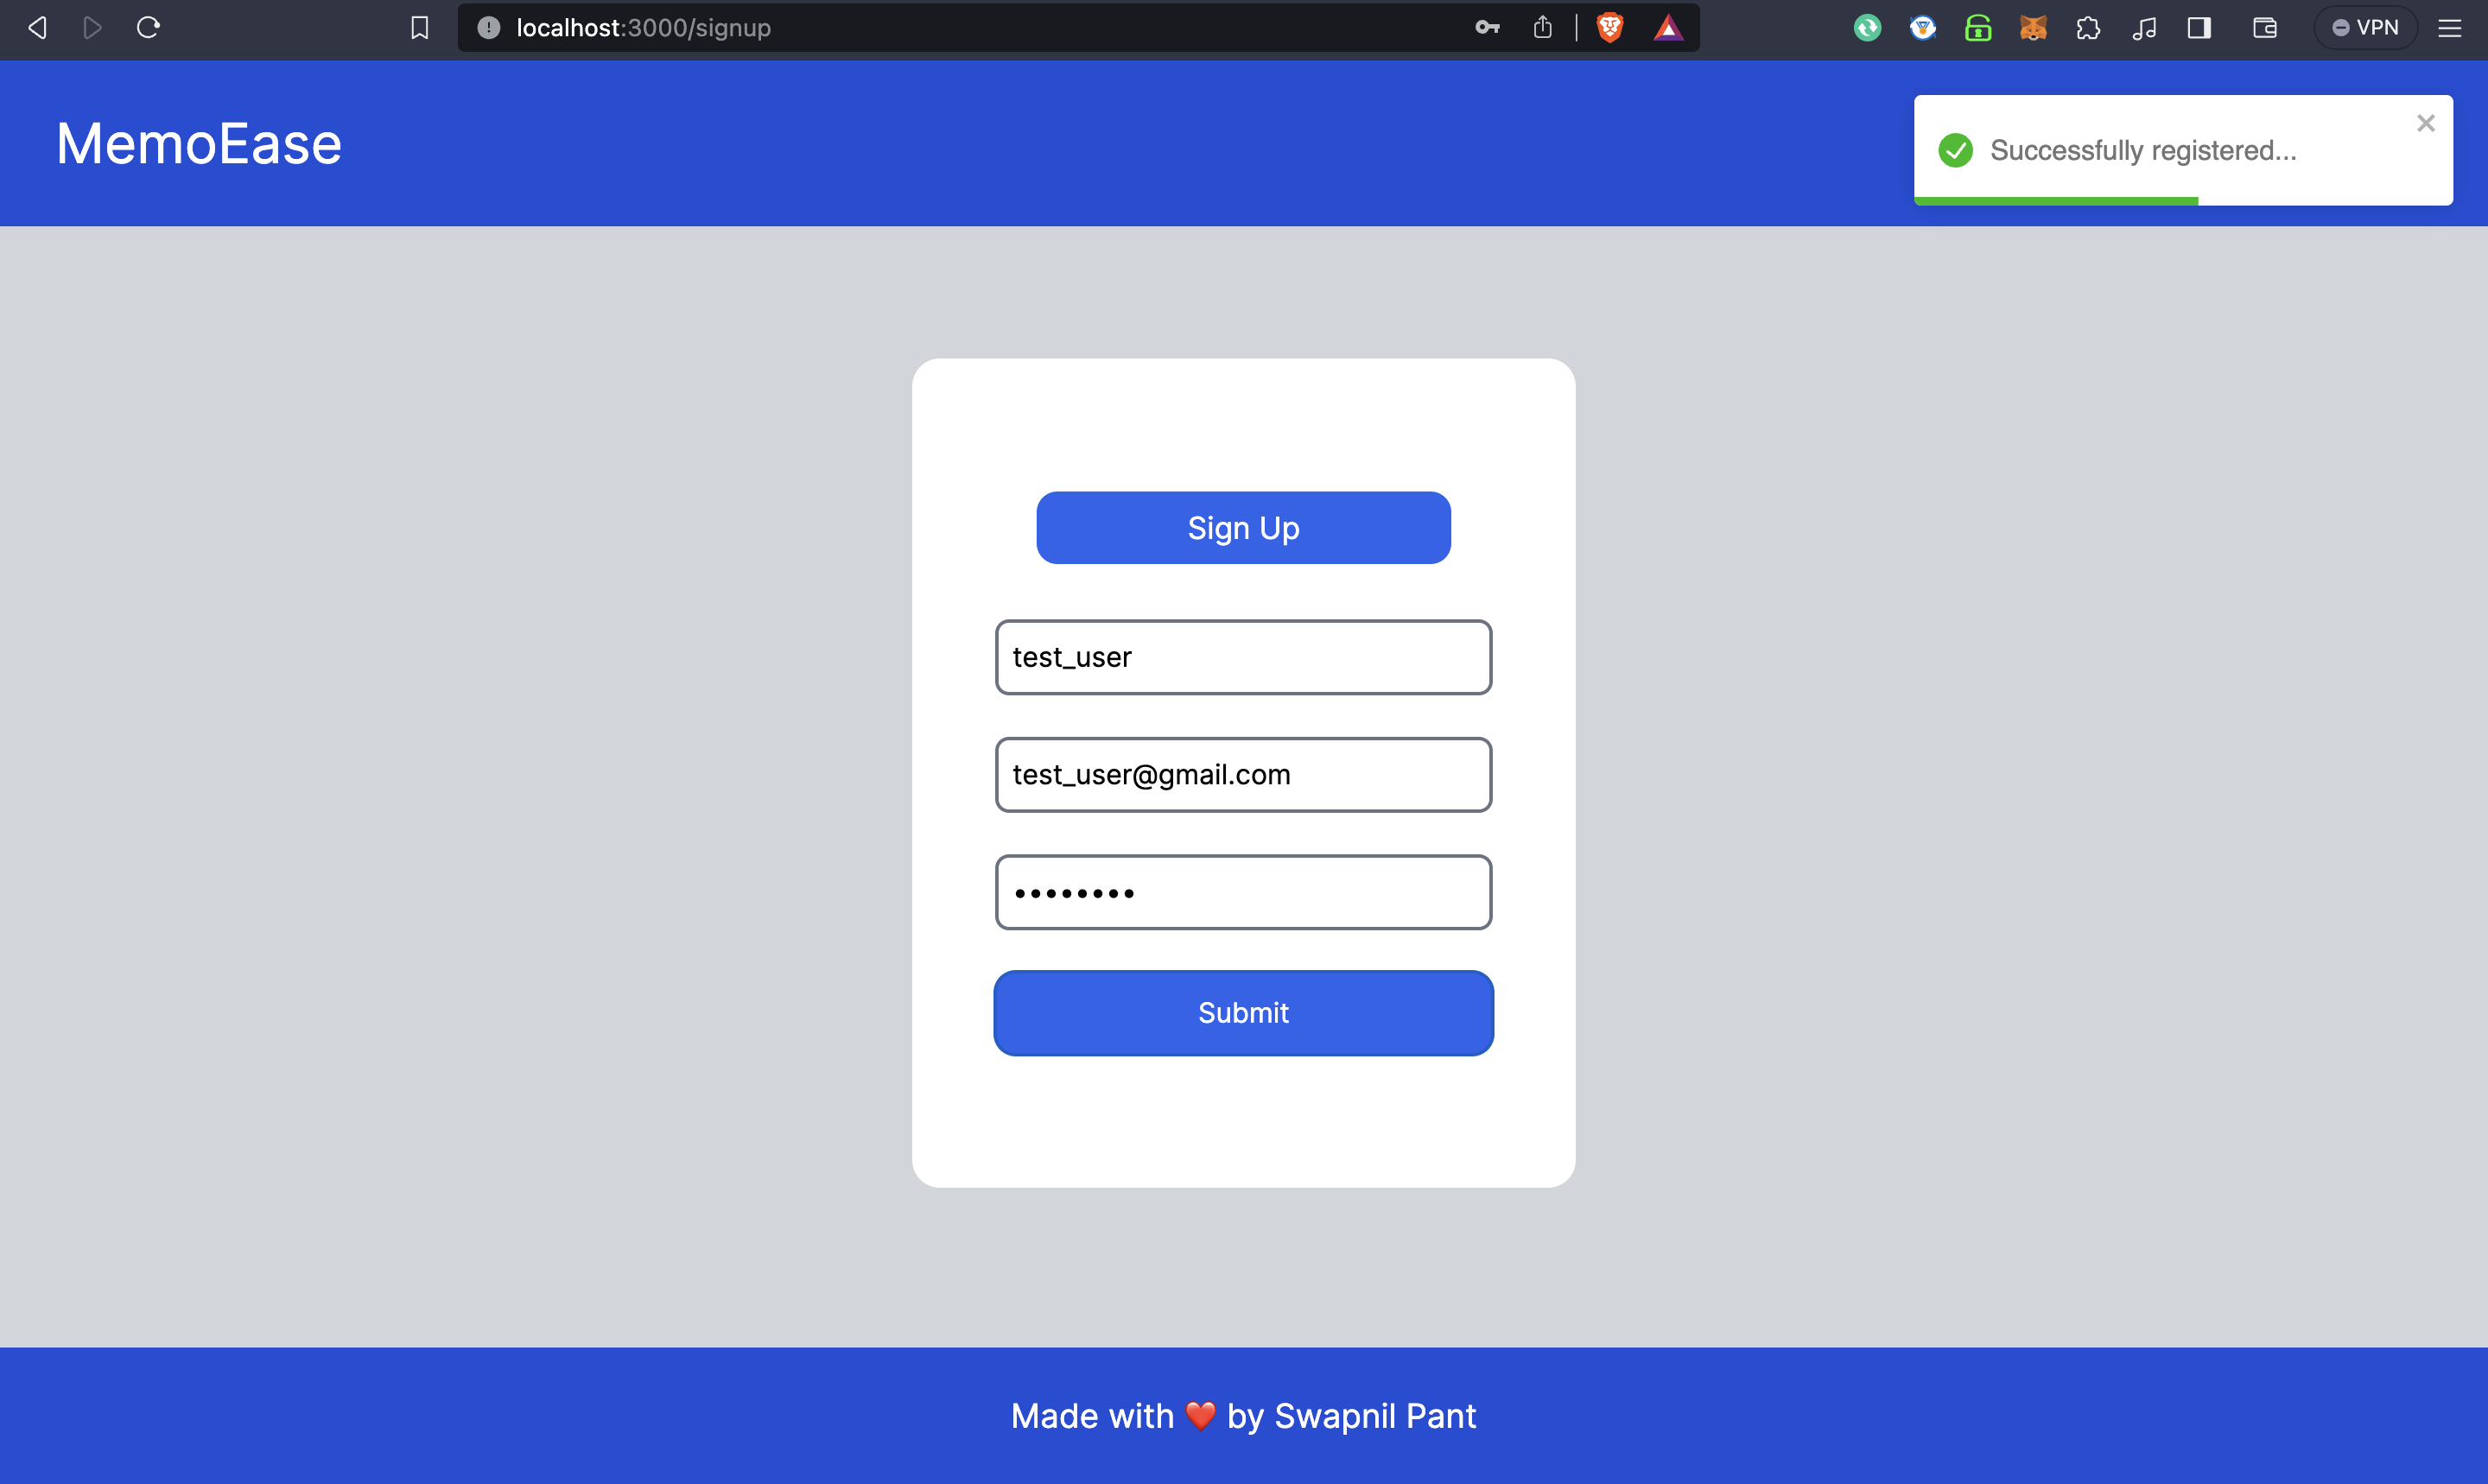
Upon clicking Submit, you will get a notification Successfully registered...
Next, try to login using the same credentials.

You will notice how the username appears on the top along with the option to Logout.
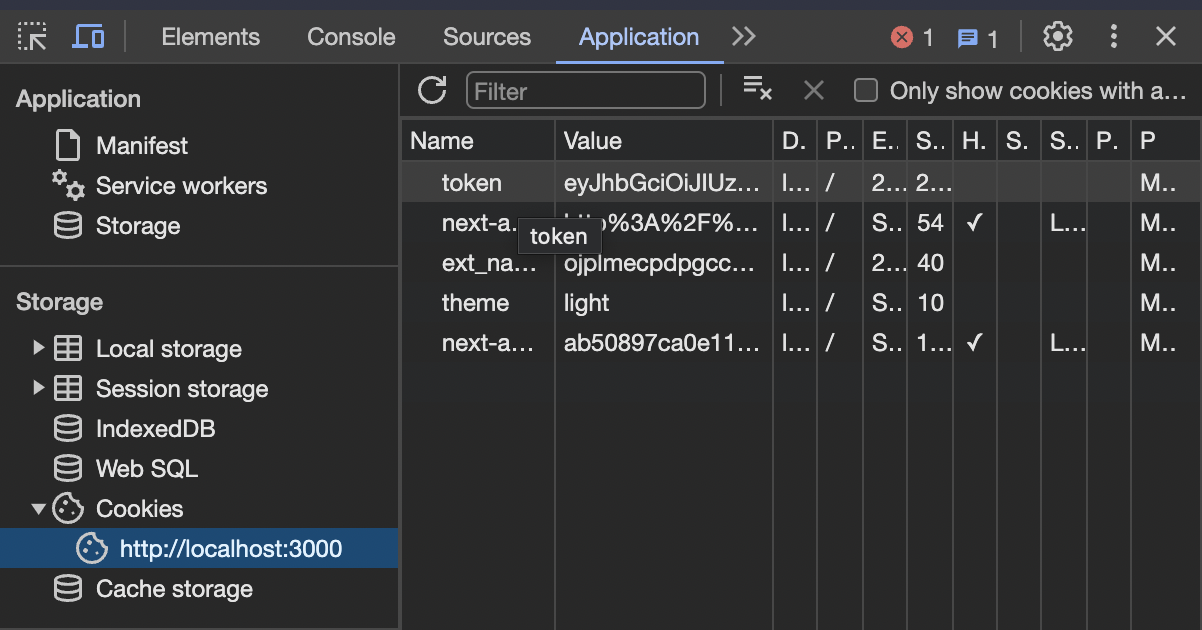
You can also go to Application and notice that there would be a new cookie there with the key named as token.
Congratulations, you are done with implementing the SignUp and Login routes on the client side.
Next, let's start working on the Notes part. First create a new hook
fetchNotes.tsto implement the required hook to fetch our notes.```typescript import axios from "axios"; import { useState, useEffect } from "react"; import { useAuth } from "../context/AuthContext";
interface Note { id: string; title: string; description: string; }
interface ApiResponse { notes: Note[]; }
const fetchNotes = () => { const { token } = useAuth(); const [notes, setNotes] = useState([]); const [loading, setLoading] = useState(true); const [error, setError] = useState(null);
useEffect(() => { const fetchData = async () => { try { if(!token) throw new Error("Token not found!");
const response = await axios.get("http://localhost:8080/fetchNotes", { headers: { Authorization:
Bearer ${token}, }, });setNotes(response.data.notes); } catch (error: any) { setError(error.response?.data || error.message); } finally { setLoading(false); } }
fetchData(); }, [notes, token])
return { notes, loading, error }; }
export default fetchNotes;
    Next, first let's create a card for our notes. In the `/components` folder create a new file called `NotesCard.tsx` and include the following code in it:

    ```typescript
    import React, { useState } from 'react';

    interface NotesCardProps {
      id: string;
      title: string;
      description: string;
    }

    const NotesCard: React.FC<NotesCardProps> = ({ id, title, description }) => {

      return (
        <div className="relative h-[18rem] w-[25rem] border-2 border-black rounded-xl">
          <div className="h-[4rem] bg-blue-700 rounded-tr-xl rounded-tl-xl text-white flex items-center p-4">
            {title}
          </div>

          <div className="flex items-center p-4 h-[9rem] my-[1rem] overflow-scroll">
            {description}
          </div>

          <div className="h-[3rem] w-[100%] rounded-br-xl rounded-bl-xl bg-blue-700 text-white absolute bottom-0 flex flex-row items-center justify-center gap-x-8">
            <div className="cursor-pointer">
              Edit
            </div>
            <div className="cursor-pointer">
              Delete
            </div>
          </div>
        </div>
      );
    };

    export default NotesCard;
The card would look something like this:
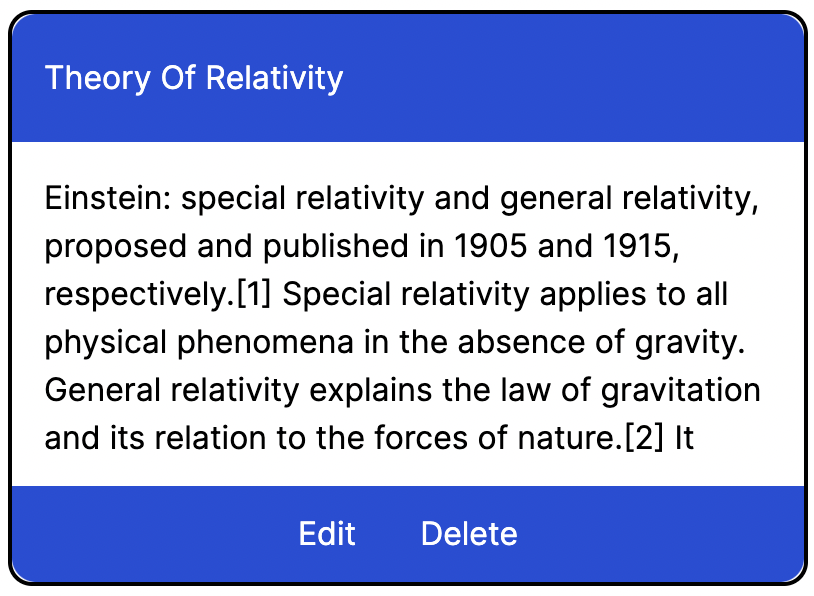
You can change the design according to your taste.
Next, let's create a new folder called
/notesand a file calledpage.tsxin it.The file would have the following code:
'use client'
import React, { useState, useEffect } from 'react';
import NotesCard from '../components/NotesCard';
import { useAuth } from '../context/AuthContext';
import fetchNotes from '../hooks/fetchNotes';

const Notes = () => {
  const { token } = useAuth();
  const [isMounted, setIsMounted] = useState(false);
  const { notes, loading, error } = fetchNotes();

// This part exists to resolve the hydration error.
  useEffect(() => {
    setIsMounted(true);
  }, []);

  if (!isMounted) {
    return null;
  }

  const handleModal = () => {
    setIsModalOpen(!isModalOpen);
  };

  return (
    <div>
      {token ? (
        <>
          <div className="flex flex-row justify-between px-20 items-center mt-[8rem]">
            <h1 className="text-[2rem]">Your Notes</h1>
            <button className="flex p-4 rounded-xl bg-blue-700 text-white">
              Add a new note
            </button>
          </div>
          <div className="flex flex-row px-12 flex-wrap gap-10 h-screen w-screen items-center justify-center" style={{ paddingTop: '4rem', paddingBottom: '60rem' }}>
            {loading ? (
              <p>Loading...</p>
            ) : error ? (
              <p>Error: {error}</p>
            ) : notes.length > 0 ? (
              notes.map(note => (
                <NotesCard key = {note.id} id = {note.id} title = {note.title} description = {note.description} />
              ))
            ) : (
              <div className="flex w-screen h-screen justify-center text-[3rem]">
                No notes found!!! Add a new note.
              </div>
            )}
          </div>
        </>
      ) : (
        <div className="flex w-screen h-screen justify-center items-center text-[3rem]">
          You aren't signed in, sign in first or create a new account!!!
        </div>
      )}
    </div>
  );
};

export default Notes;
You can see how we have an option to add a new note and along with that all the Notes that exist in the database for the currently logged in user.
The
/notespage would look something like: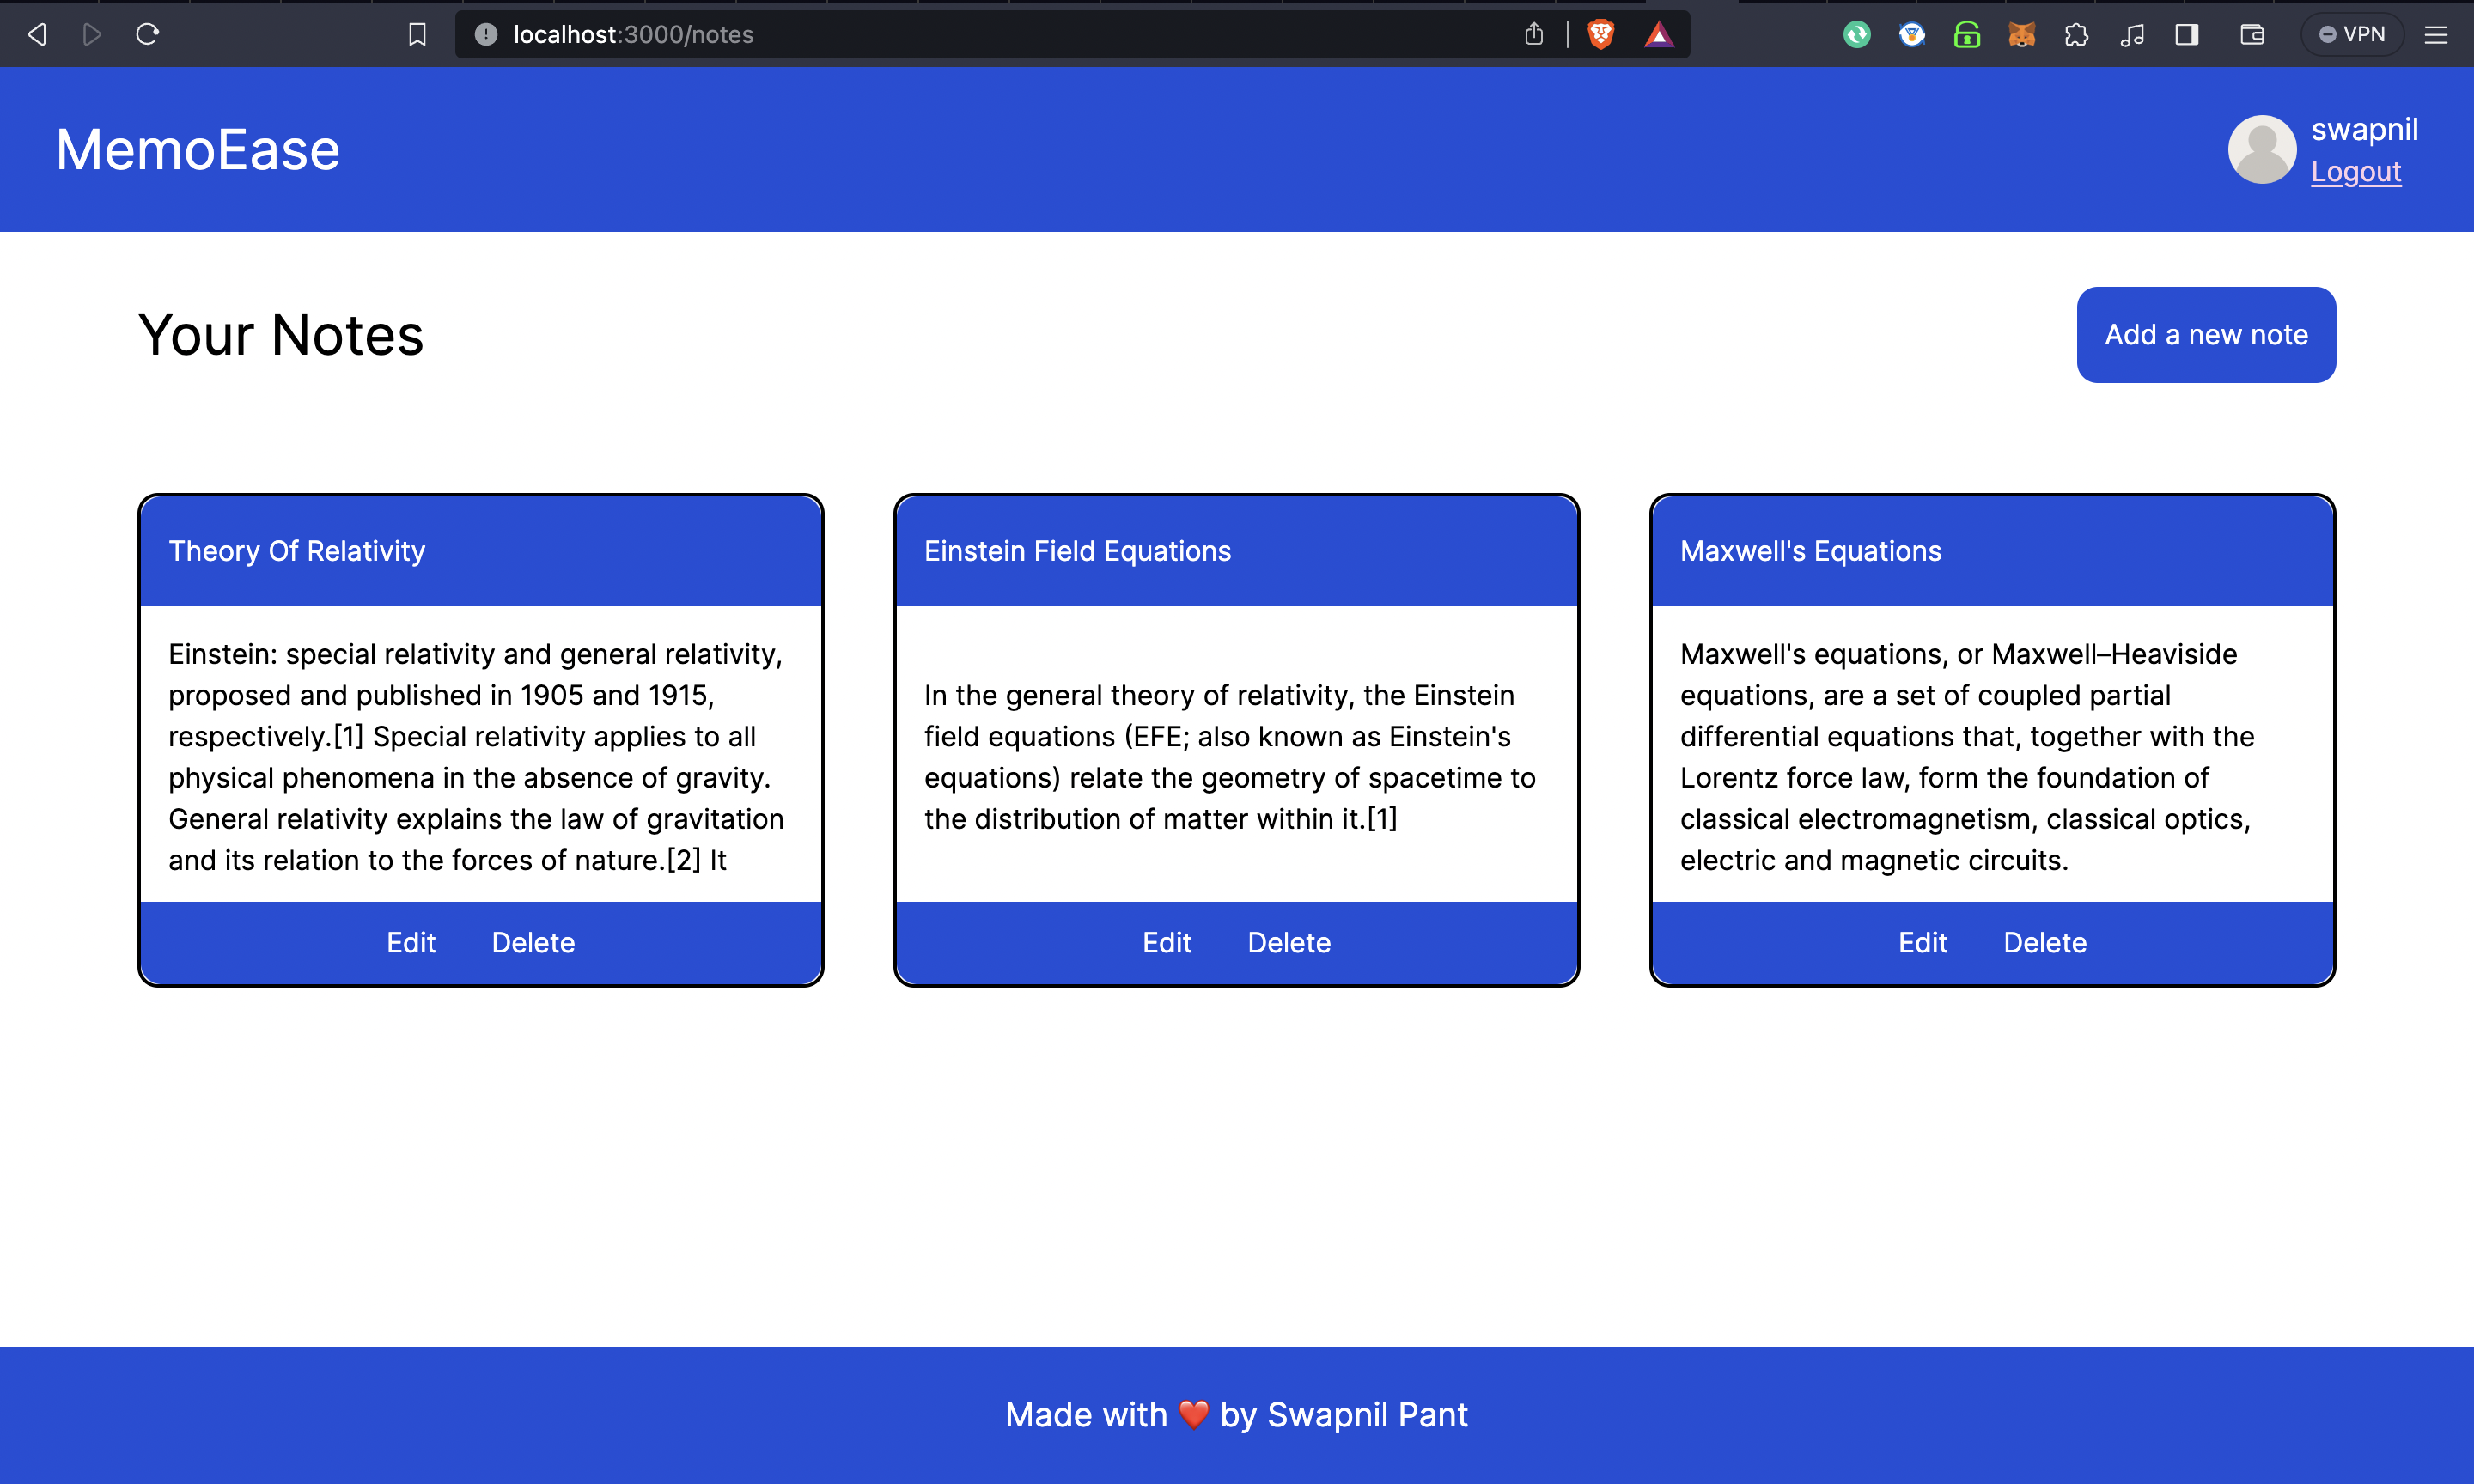
Now, the three features that are left are to add a new note, to edit a note and to delete a note.
First let's start with implementing the Add a new note feature. For that we will follow the same procedure. Create a new hook
useAddNote.tswith the following content in it:import axios from "axios"; import { useAuth } from "../context/AuthContext"; interface ApiResponse { success: boolean; data: any; } const useAddNote = () => { const { token } = useAuth(); const addNote = async(title: string, description: string): Promise<ApiResponse> => { try { const response = await axios.post<ApiResponse>( "http://localhost:8080/addNote", { title, description }, { headers: { Authorization: `Bearer ${token}`, }, } ); return response.data; } catch(error) { console.log("Error adding note: ", error); throw error; } } return { addNote }; } export default useAddNote;Then, we need to create a modal, that will open up upon clicking the button: Add a new note, you can put the title and description of the note and then click on submit to view your new note.
For doing the same create a new component called
NoteModal.tsxand include the following code in it:import React, { useState, FormEvent } from 'react'; import useAddNote from '../hooks/useAddNote'; interface NoteModalProps { onClose: () => void; } const NoteModal: React.FC<NoteModalProps> = ({ onClose }) => { const [title, setTitle] = useState(''); const [description, setDescription] = useState(''); const { addNote } = useAddNote(); const handleSubmit = async (e: FormEvent<HTMLFormElement>) => { e.preventDefault(); try { const response = await addNote(title, description); onClose(); } catch (error) { // Handle errors console.error('Error adding note:', error); } }; return ( <div className="fixed inset-0 flex items-center justify-center bg-black bg-opacity-50"> <div className="bg-white w-[27rem] h-[28rem] rounded-xl border-2 border-black flex flex-col items-center justify-center relative"> <h1 onClick={onClose} className="absolute right-4 top-4 cursor-pointer" > X </h1> <form onSubmit={handleSubmit} className="flex flex-col items-center justify-center gap-y-4" > <input type="text" placeholder="Title" value={title} onChange={(e) => setTitle(e.target.value)} className="w-[22rem] h-[3rem] border-2 border-black p-2 rounded-lg" /> <textarea placeholder="Description" value={description} onChange={(e) => setDescription(e.target.value)} className="w-[22rem] h-[15rem] border-2 border-black p-2 rounded-lg" /> <button type="submit" className="bg-blue-700 text-white p-4 rounded-lg w-[22rem] h-[3rem] flex items-center justify-center" > Submit </button> </form> </div> </div> ); }; export default NoteModal;Then go to your notes page code and update the implementation as:
'use client'
import React, { useState, useEffect } from 'react';
import NotesCard from '../components/NotesCard';
import { useAuth } from '../context/AuthContext';
import fetchNotes from '../hooks/fetchNotes';
import NoteModal from '../components/NoteModal';

const Notes = () => {
  const { token } = useAuth();
  const [isMounted, setIsMounted] = useState(false);
  const { notes, loading, error } = fetchNotes();

  const [isModalOpen, setIsModalOpen] = useState(false);

  useEffect(() => {
    setIsMounted(true);
  }, []);

  if (!isMounted) {
    return null;
  }

  const handleModal = () => {
    setIsModalOpen(!isModalOpen);
  };

  return (
    <div>
      {token ? (
        <>
          <div className="flex flex-row justify-between px-20 items-center mt-[8rem]">
            <h1 className="text-[2rem]">Your Notes</h1>
            <button className="flex p-4 rounded-xl bg-blue-700 text-white" onClick={handleModal}>
              Add a new note
            </button>
          </div>
          <div className="flex flex-row px-12 flex-wrap gap-10 h-screen w-screen items-center justify-center" style={{ paddingTop: '4rem', paddingBottom: '60rem' }}>
            {loading ? (
              <p>Loading...</p>
            ) : error ? (
              <p>Error: {error}</p>
            ) : notes.length > 0 ? (
              notes.map(note => (
                <NotesCard key = {note.id} id = {note.id} title = {note.title} description = {note.description} />
              ))
            ) : (
              <div className="flex w-screen h-screen justify-center text-[3rem]">
                No notes found!!! Add a new note.
              </div>
            )}
          </div>
        </>
      ) : (
        <div className="flex w-screen h-screen justify-center items-center text-[3rem]">
          You aren't signed in, sign in first or create a new account!!!
        </div>
      )}

       {isModalOpen && <NoteModal onClose={handleModal}/>}
    </div>
  );
};

export default Notes;
Notice how we created a new useState variable for handling the opening and closing of the modal and then created a function too for toggling of modal and passed that function to Add a new note button. Now, upon clicking that button you will see a modal open up, using which you can create a new note as required. AND BINGO!!! Your note will be shown on the
/notespage as expected.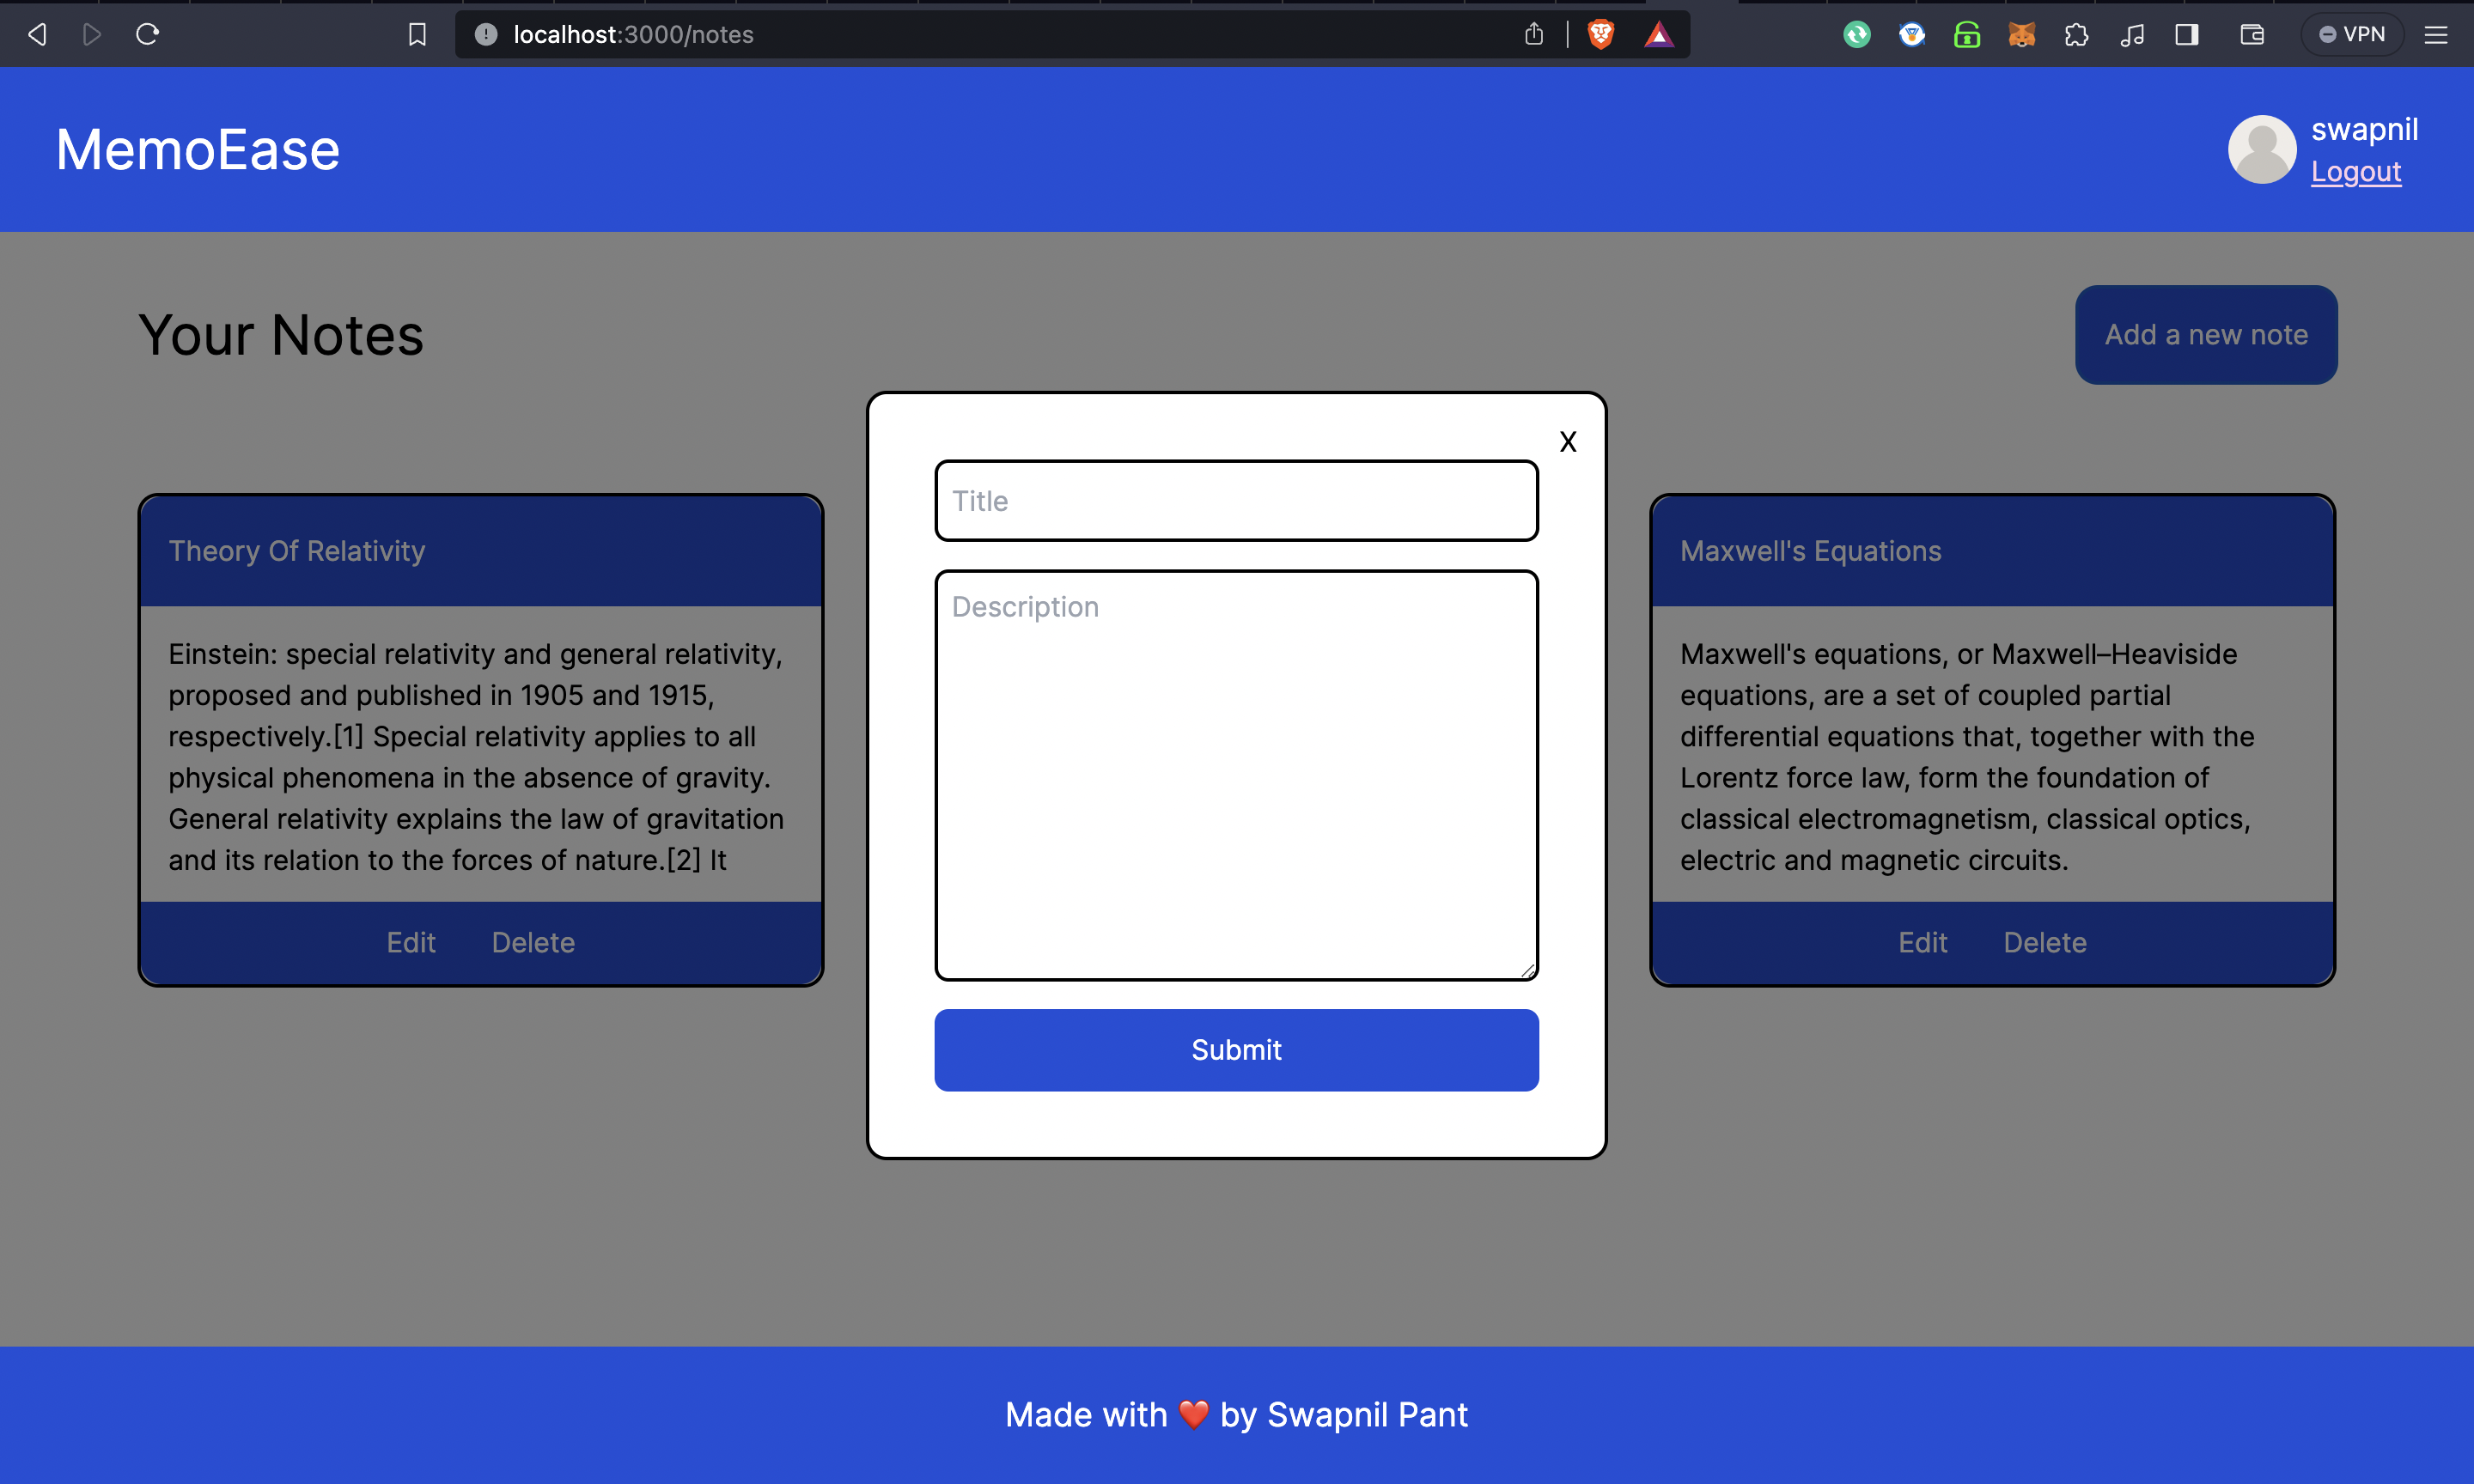


Now, let's implement the feature to delete a note, for this create a hook
useDeleteNote.tsimport axios from "axios"; import { useAuth } from "../context/AuthContext"; interface ApiResponse { success: boolean; data: any; } const useDeleteNote = () => { const { token } = useAuth(); const deleteNote = async (noteId: string): Promise<ApiResponse> => { try { const response = await axios.delete<ApiResponse>(`http://localhost:8080/deleteNote/${noteId}`, { headers: { Authorization: `Bearer ${token}`, }, }); return response.data; } catch (error) { console.error("Error deleting note: ", error); throw error; } }; return { deleteNote }; }; export default useDeleteNote;Next, go to your
NotesCard.tsxfile and update the code as follows:import React, { useState } from 'react'; import useDeleteNote from '../hooks/useDeleteNote'; import { ToastContainer, toast } from 'react-toastify'; import 'react-toastify/dist/ReactToastify.css'; interface NotesCardProps { id: string; title: string; description: string; } const NotesCard: React.FC<NotesCardProps> = ({ id, title, description }) => { const { deleteNote } = useDeleteNote(); const handleDeleteNote = async () => { try { const response = await deleteNote(id); if(response.success){ toast.success("Note deleted successfully"); }else{ toast.error("Failed to delete note"); } } catch(error) { toast.error("Failed to delete note"); } } return ( <div className="relative h-[18rem] w-[25rem] border-2 border-black rounded-xl"> <div className="h-[4rem] bg-blue-700 rounded-tr-xl rounded-tl-xl text-white flex items-center p-4"> {title} </div> <div className="flex p-4 h-[9rem] my-[1rem] overflow-scroll"> {description} </div> <div className="h-[3rem] w-[100%] rounded-br-xl rounded-bl-xl bg-blue-700 text-white absolute bottom-0 flex flex-row items-center justify-center gap-x-8"> <div className="cursor-pointer"> Edit </div> <div className="cursor-pointer" onClick={handleDeleteNote}> Delete </div> </div> <ToastContainer/> </div> ); }; export default NotesCard;Notice, how I called the
deleteNotehook insidehandleDeleteNotefunction and passed it to theDeleteoption. Now, you will be able to delete a note.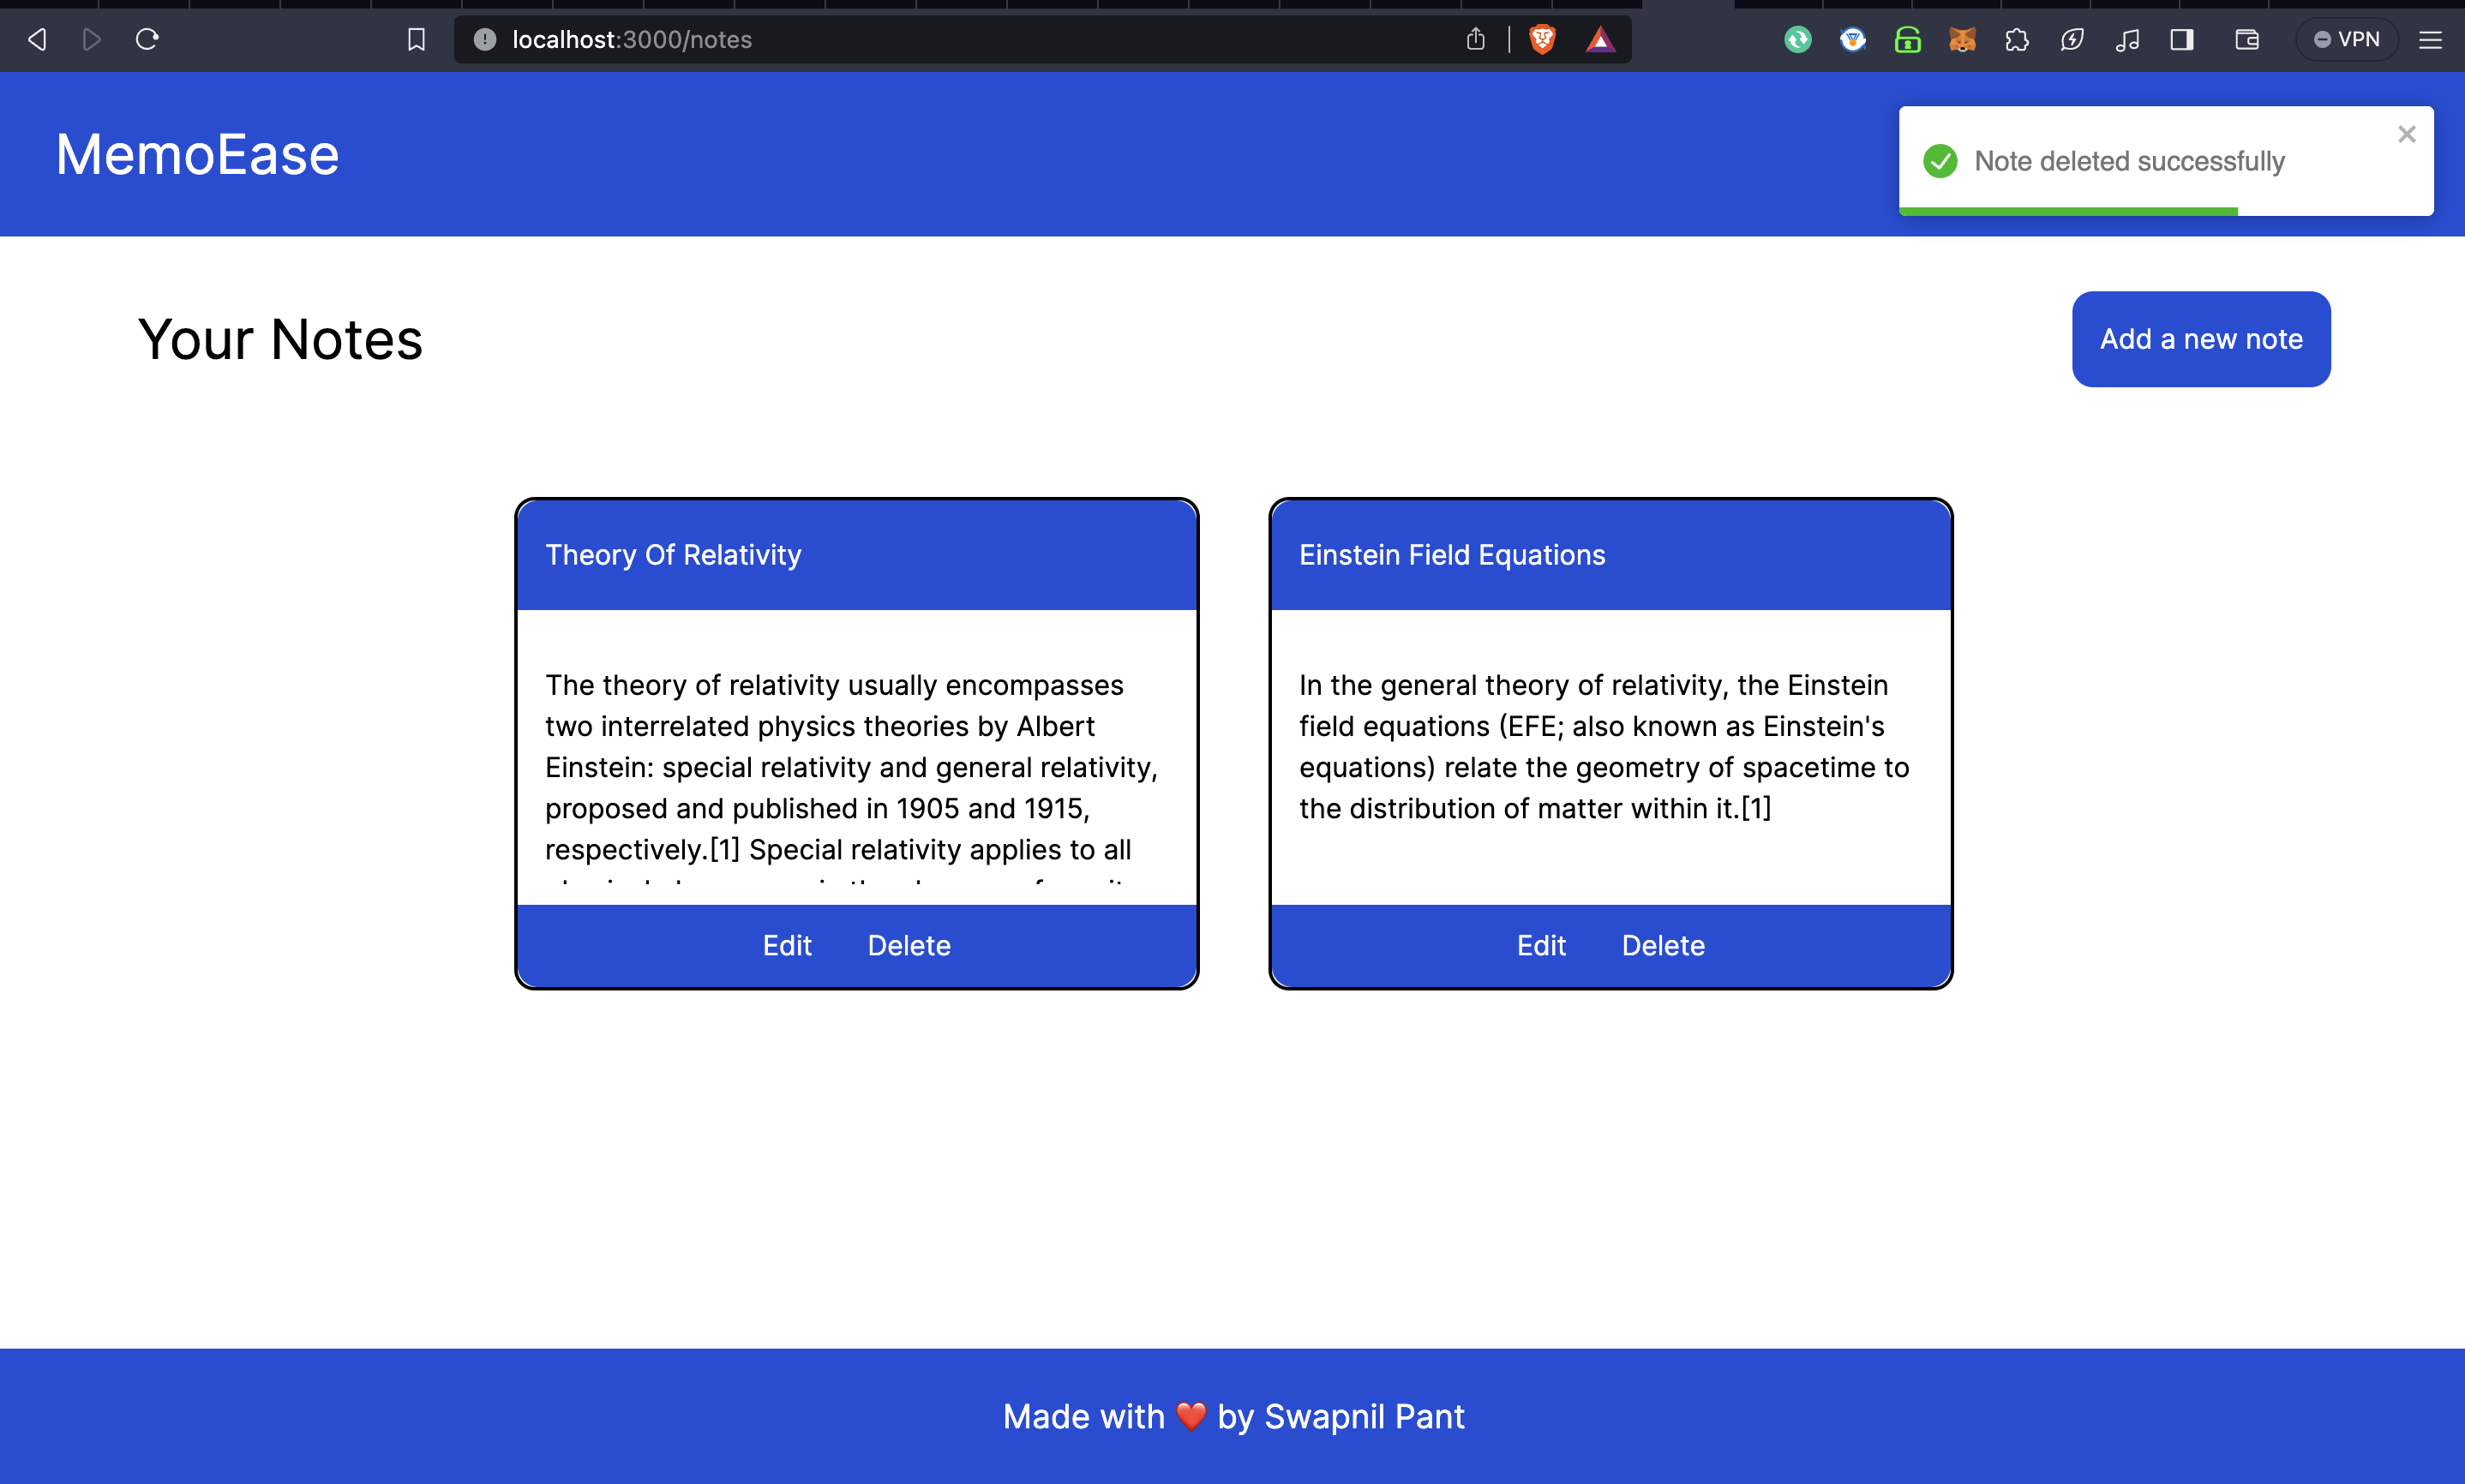
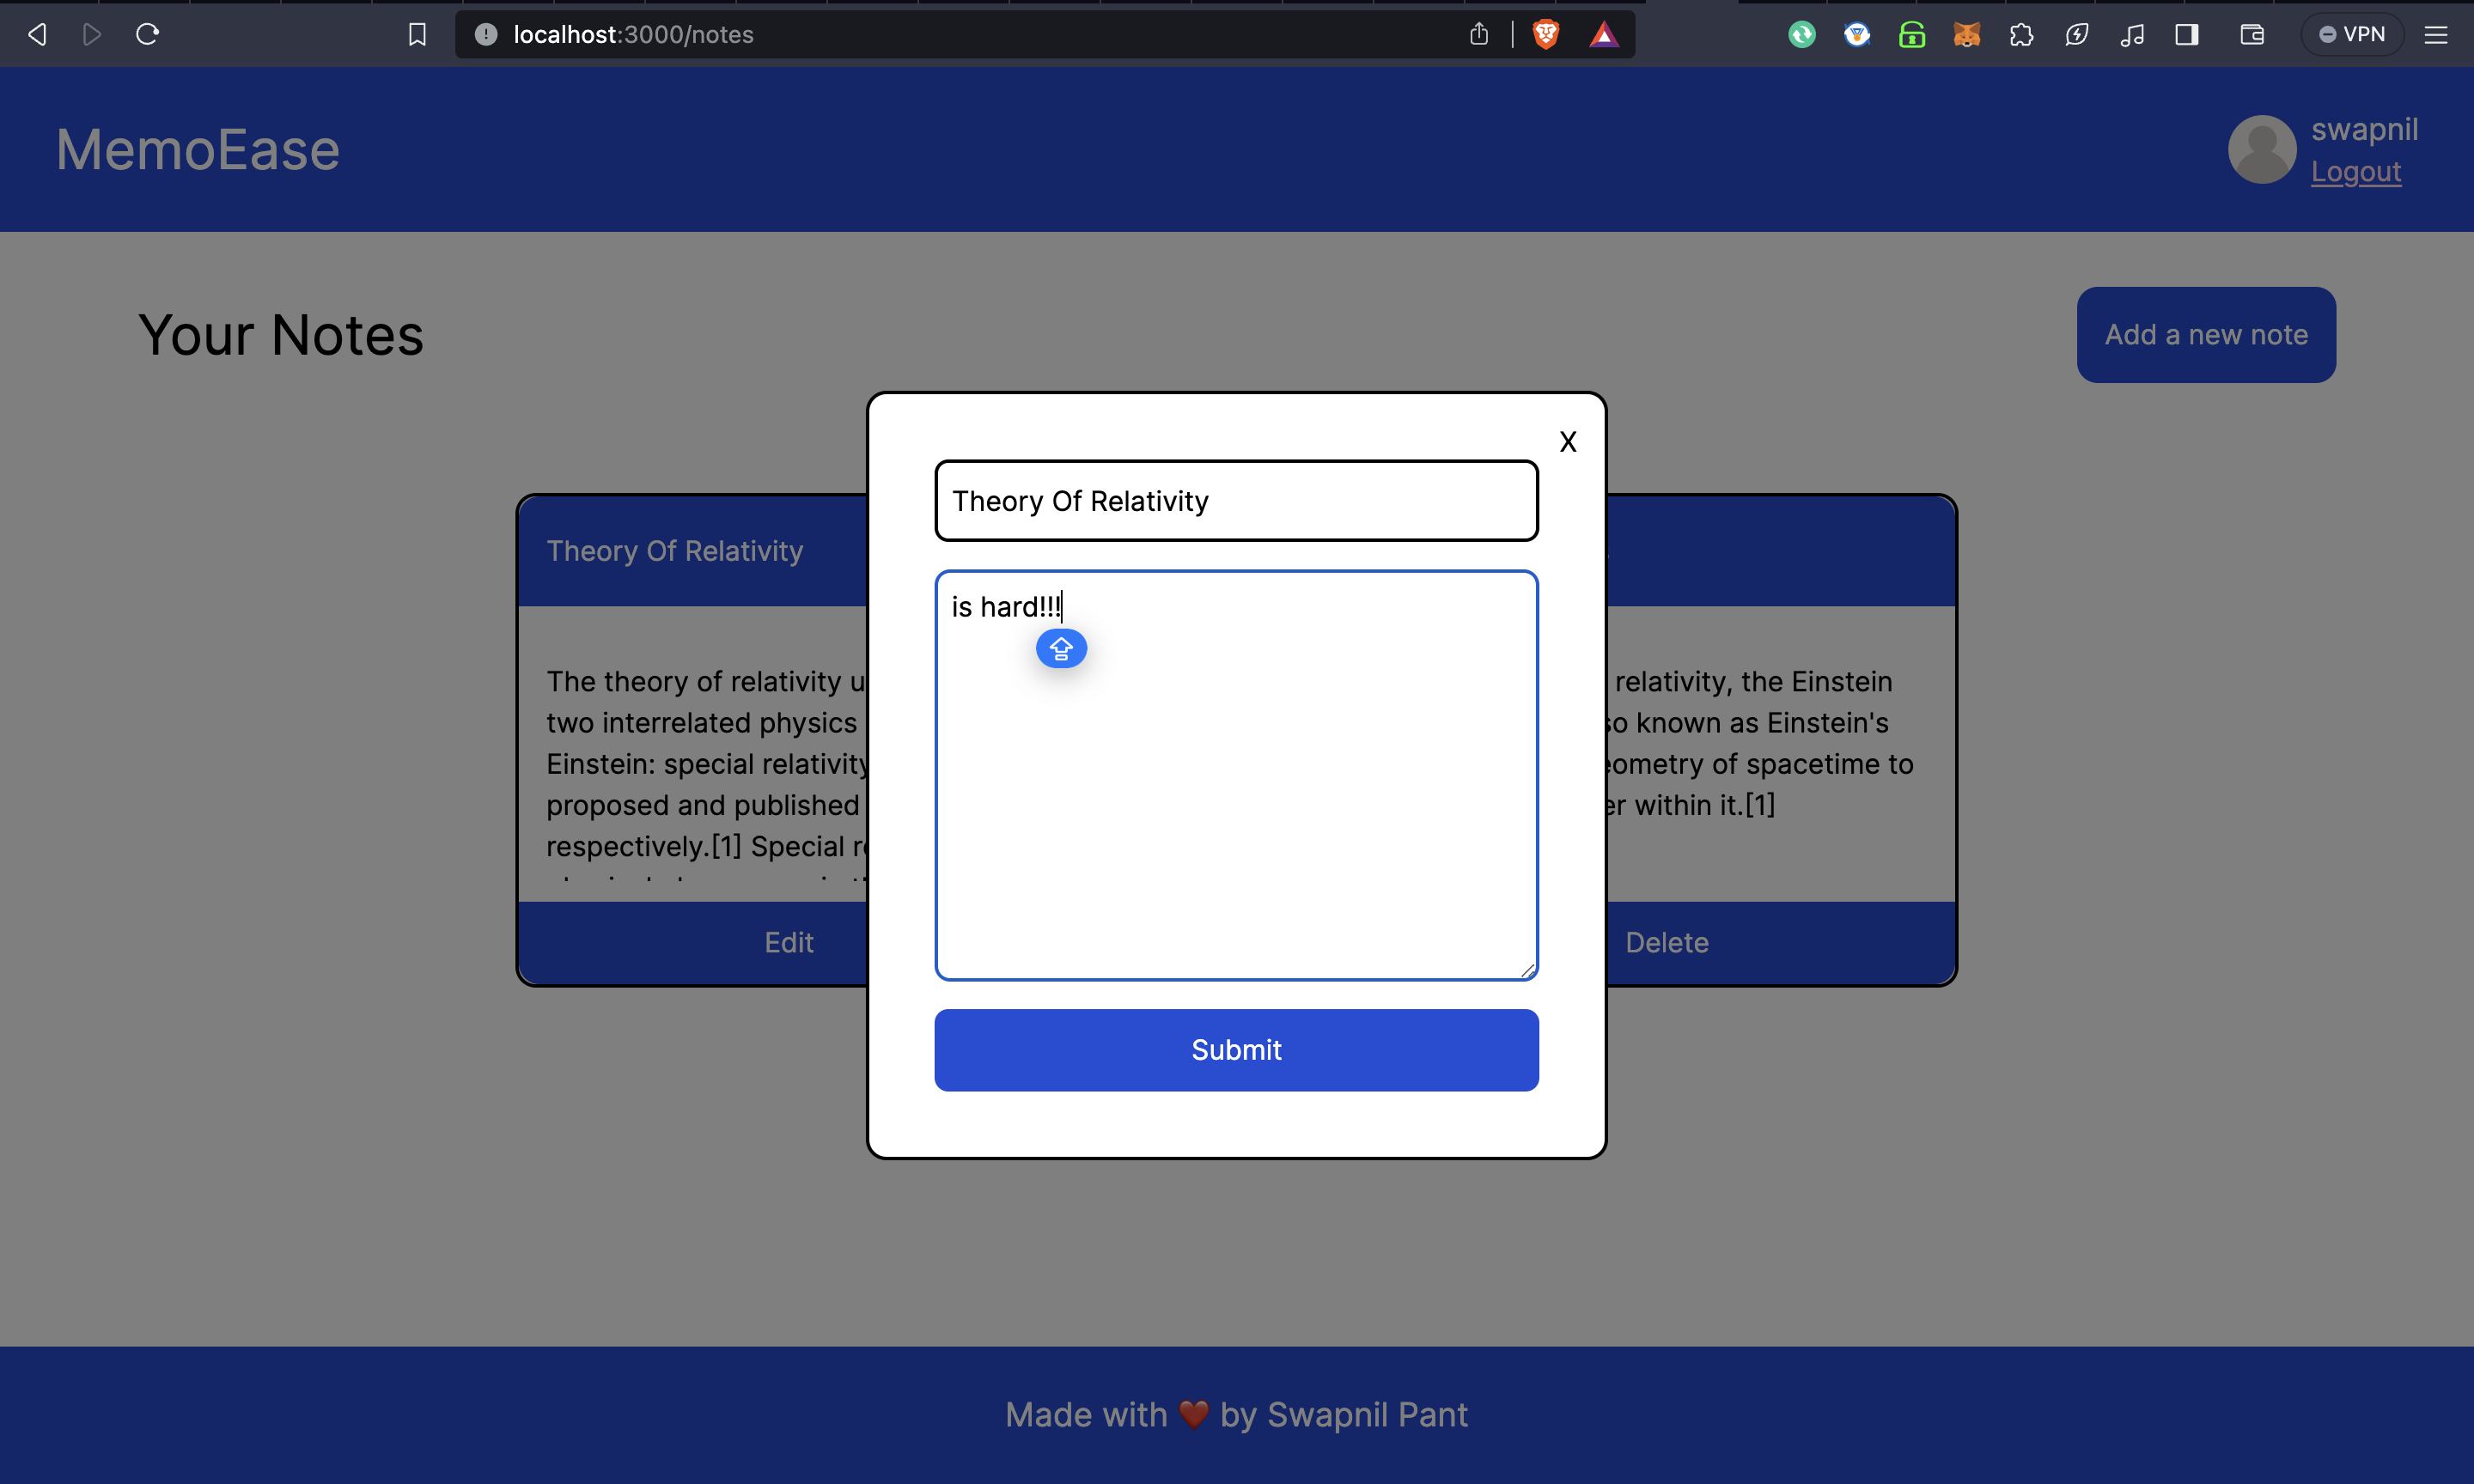
Finally, we need to add a feature to edit a particular note. For that, the idea is simple; upon clicking the Edit button, a modal shall open up displaying the current content of the Note, you can change the content and click on submit thus updating the content.
For this, first create the hook to implement the edit note route called
useEditNote.ts.// useEditNote.ts import axios from 'axios'; import { useAuth } from '../context/AuthContext'; interface ApiResponse { success: boolean; data: any; } const useEditNote = () => { const { token } = useAuth(); const editNote = async (noteId: string, title: string, description: string): Promise<ApiResponse> => { try { const response = await axios.patch<ApiResponse>( `http://localhost:8080/editNote/${noteId}`, { title, description }, { headers: { Authorization: `Bearer ${token}`, }, } ); return response.data; } catch (error) { console.error('Error editing note:', error); throw error; } }; return { editNote }; }; export default useEditNote;Then create a new component called
EditNoteModal.tsx, and call the required hook in it to update the content.import React, { useState, FormEvent } from 'react'; import useEditNote from '../hooks/useEditNote'; interface EditNoteModalProps { noteId: string; initialTitle: string; initialDescription: string; onClose: () => void; } const EditNoteModal: React.FC<EditNoteModalProps> = ({ noteId, initialTitle, initialDescription, onClose }) => { const { editNote } = useEditNote(); const [title, setTitle] = useState(initialTitle); const [description, setDescription] = useState(initialDescription); const handleSubmit = async (e: FormEvent<HTMLFormElement>) => { e.preventDefault(); try { const response = await editNote(noteId, title, description); onClose(); } catch (error) { console.error('Error editing note:', error); } }; return ( <div className="fixed inset-0 flex items-center justify-center bg-black bg-opacity-50"> <div className="bg-white w-[27rem] h-[28rem] rounded-xl border-2 border-black flex flex-col items-center justify-center relative"> <h1 className="absolute right-4 top-4 cursor-pointer" onClick={onClose}> X </h1> <form className="flex flex-col items-center justify-center gap-y-4" onSubmit={handleSubmit}> <input type="text" placeholder="Title" className="w-[22rem] h-[3rem] border-2 border-black p-2 rounded-lg" value={title} onChange={(e) => setTitle(e.target.value)} /> <textarea placeholder="Description" className="w-[22rem] h-[15rem] border-2 border-black p-2 rounded-lg" value={description} onChange={(e) => setDescription(e.target.value)} /> <button className="bg-blue-700 text-white p-4 rounded-lg w-[22rem] h-[3rem] flex items-center justify-center" type="submit"> Submit </button> </form> </div> </div> ); }; export default EditNoteModal;Then, go to the
/notespage code, and update the code as follows:'use client' import React, { useState, useEffect } from 'react'; import NotesCard from '../components/NotesCard'; import { useAuth } from '../context/AuthContext'; import fetchNotes from '../hooks/fetchNotes'; import NoteModal from '../components/NoteModal'; const Notes = () => { const { token } = useAuth(); const [isMounted, setIsMounted] = useState(false); const { notes, loading, error } = fetchNotes(); const [isModalOpen, setIsModalOpen] = useState(false); useEffect(() => { setIsMounted(true); }, []); if (!isMounted) { return null; } const handleModal = () => { setIsModalOpen(!isModalOpen); }; return ( <div> {token ? ( <> <div className="flex flex-row justify-between px-20 items-center mt-[8rem]"> <h1 className="text-[2rem]">Your Notes</h1> <button className="flex p-4 rounded-xl bg-blue-700 text-white" onClick={handleModal}> Add a new note </button> </div> <div className="flex flex-row px-12 flex-wrap gap-10 h-screen w-screen items-center justify-center" style={{ paddingTop: '4rem', paddingBottom: '60rem' }}> {loading ? ( <p>Loading...</p> ) : error ? ( <p>Error: {error}</p> ) : notes.length > 0 ? ( notes.map(note => ( <NotesCard key = {note.id} id = {note.id} title = {note.title} description = {note.description} /> )) ) : ( <div className="flex w-screen h-screen justify-center text-[3rem]"> No notes found!!! Add a new note. </div> )} </div> </> ) : ( <div className="flex w-screen h-screen justify-center items-center text-[3rem]"> You aren't signed in, sign in first or create a new account!!! </div> )} {isModalOpen && <NoteModal onClose={handleModal}/>} </div> ); }; export default Notes;Notice, how upon clicking a particular note's Edit option, the
EditNoteModalopens up and it will do the required job.

Bingo!!! There goes your complete full stack app built from scratch.
Here's the GitHub link to the project:
https://github.com/swapn652/MemoEase
I have also opened some issues that you can try out for practice.
You can reach out to me on:


